
Among the things I didn’t get with my used Ford Flex was the factory towing package. The factory tow hitch is integrated into the back bumper compared to underneath the bumper with aftermarket hitches. I wanted the cleaner look and additional clearance.
I was able to install the factory hitch with aftermarket 4 pin wiring in one afternoon. This writeup is for folks who are considering the same. This project is simpler than it first appears. The instructions included with both the hitch and the wiring was very good. I was able to do the entire thing as a one man job in about 3 hours, and I was moving slowly. Clicking on just about any picture should show the full size version.
{updated 3/3/12 to call out some comments and add a picture of the 4 pin mount I’m using…}
{updated 9/29/14 (wow-this post has some legs!) to make a note about wire colors…}
{updated 2/19/21 to note updated part number…}
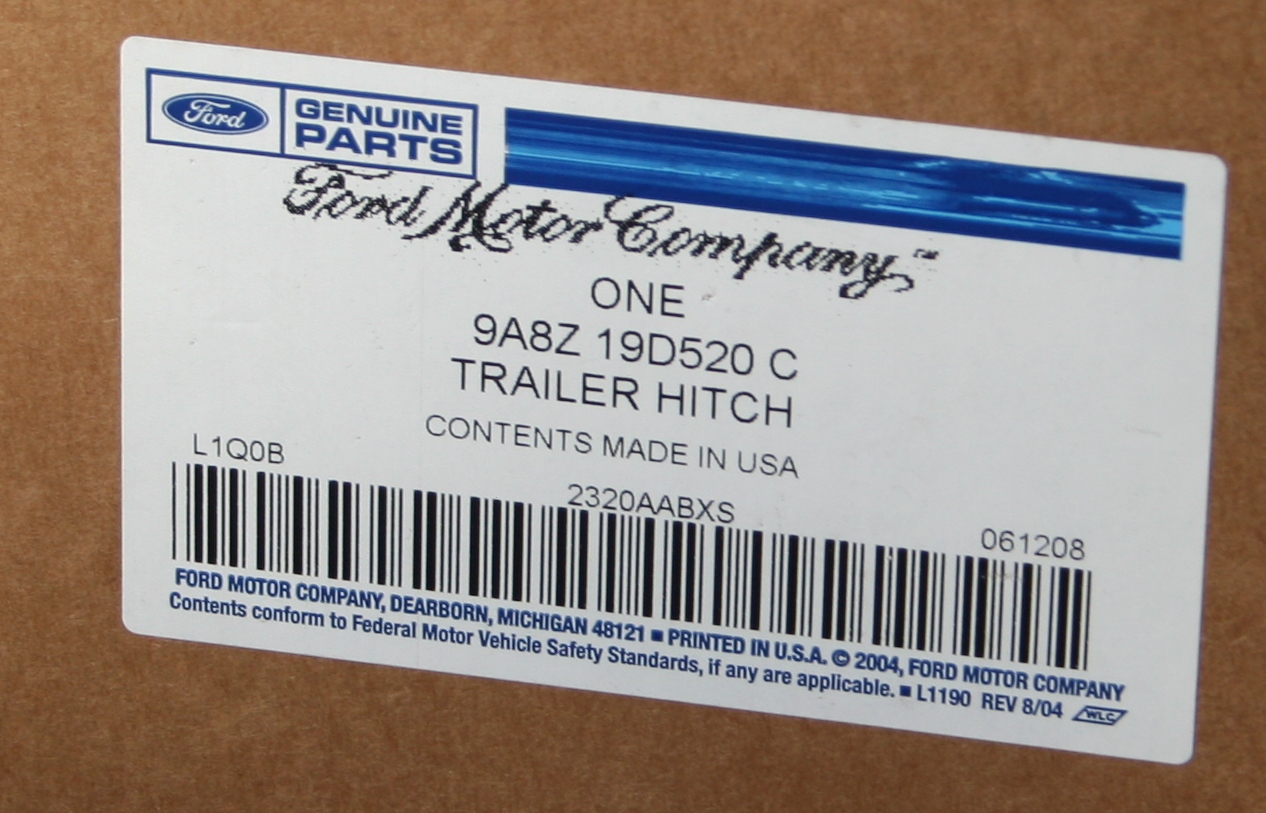
- The factory hitch, part number 9A8Z-19D520-C. For me the best deal was getting my local dealer to order it. I was quoted the exact price listed at accessories.ford.com, but didn’t have to pay shipping. This hitch is a bolt on replacement and comes complete with everything except the wiring. [http://accessories.ford.com/kit-trailer-hitch-bar-9477.html] Update: There is a new revision of this hitch, the part number is now 9A8Z-19D520-D. [Ford.com link]
- The T-One Connector Assembly for the Flex from etrailer.com. This is a plug and play solution with a 4-pin connector.[http://www.etrailer.com/Custom-Fit-Vehicle-Wiring/Tow-Ready/118472.html]
- Zip ties and wire wrap.
Part 1: Teardown
- I backed the car up on ramps. Smart move- it made getting to the bumper and underneath much easier.

- Remove the taillights. Two screws hold the housing in on each side. Remove and pull the entire taillight backwards.

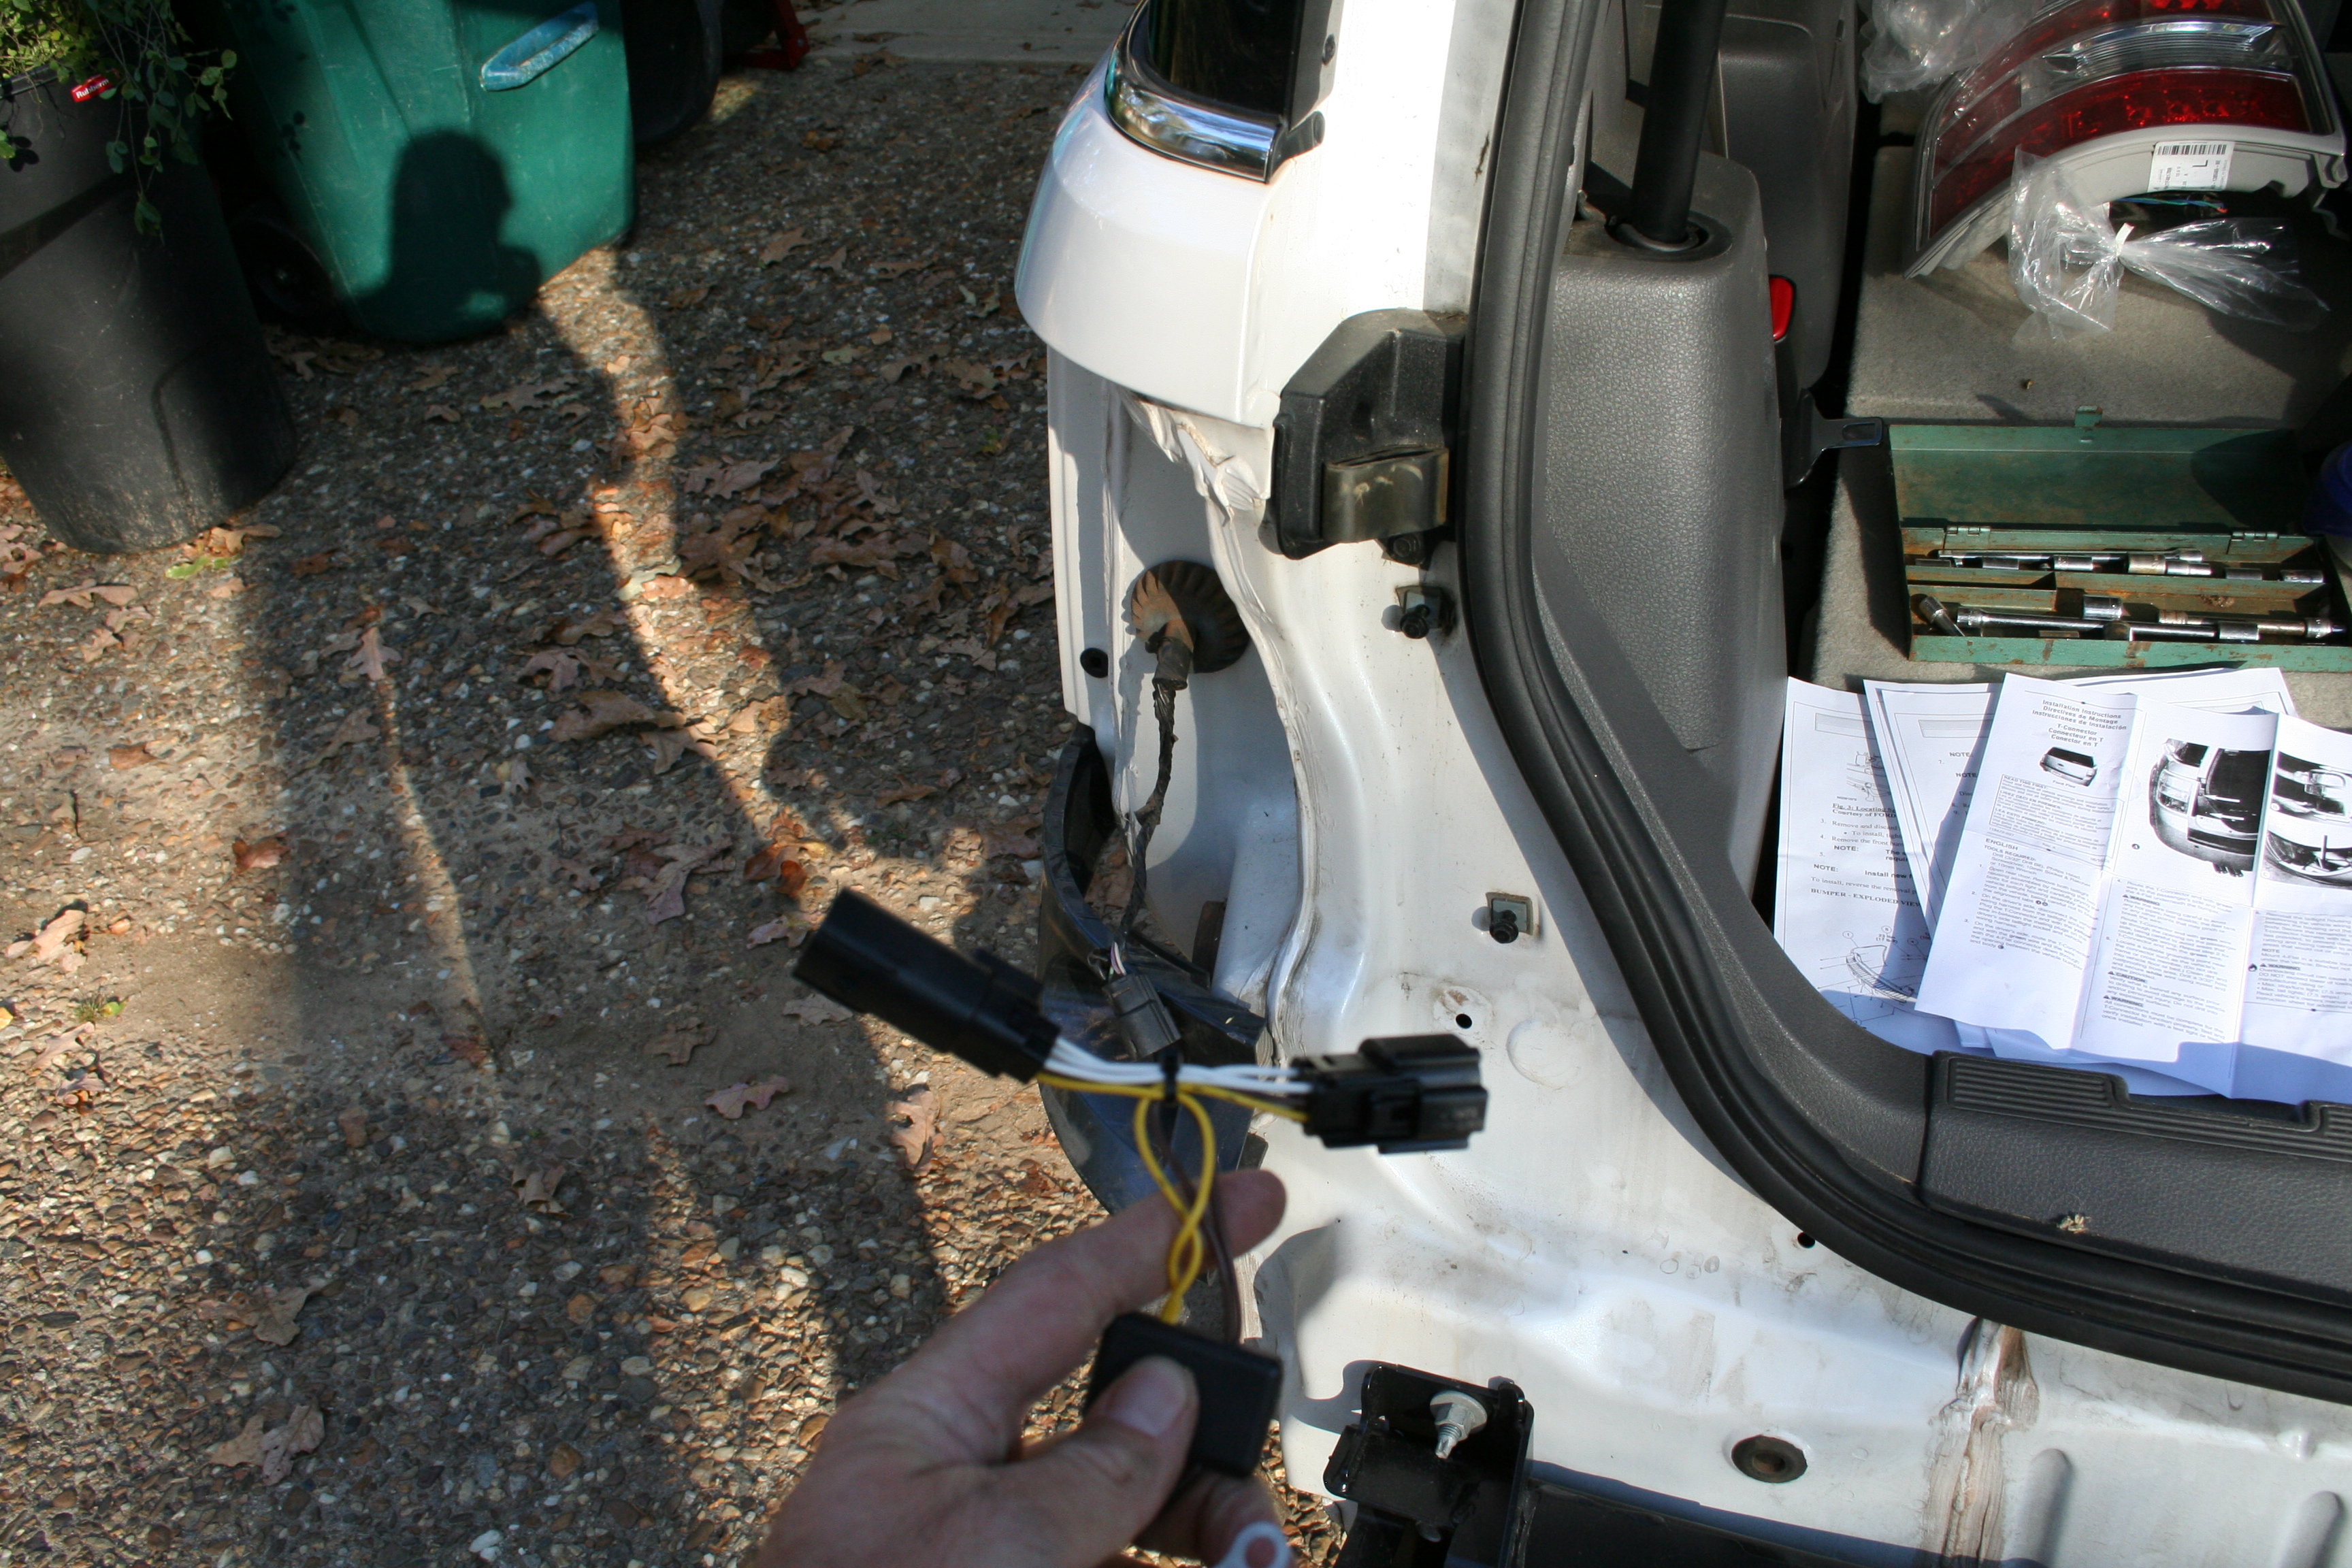
- Finish removing the taillights by disconnecting the wiring. The picture below shows the back of the taillight housing in gray. To disconnect, push down the tab on the connector and pull the two ends apart.

- Remove the screws attaching the rear wheelhouse to the rear bumper. (Technically, the body color plastic piece is the “rear bumper cover”, but I’m calling it bumper for now.) These screws have 5.5mm heads. There are 3 on each side.

- Remove the license plate.
- There are 2 “scrivets”, (screw+rivet, see what they did there?) behind the license plate and 5 scrivets behind the tailgate.
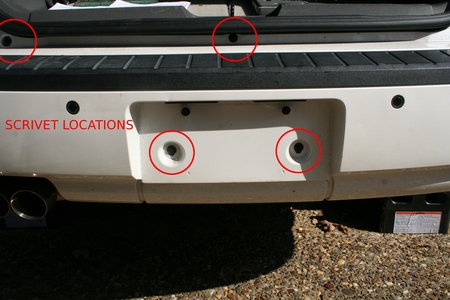 Remove these by gently unscrewing them partway and then gently using pliers to gently remove them. Why the soft touch, you ask? Because I have not found replacements for them yet. The part number I have, “W710250” is getting me nowhere. Any folks with OEM replacement info, please leave a comment! {see comments below where a reader provided a different part number (# W713445-S300) – thanks Mark!}
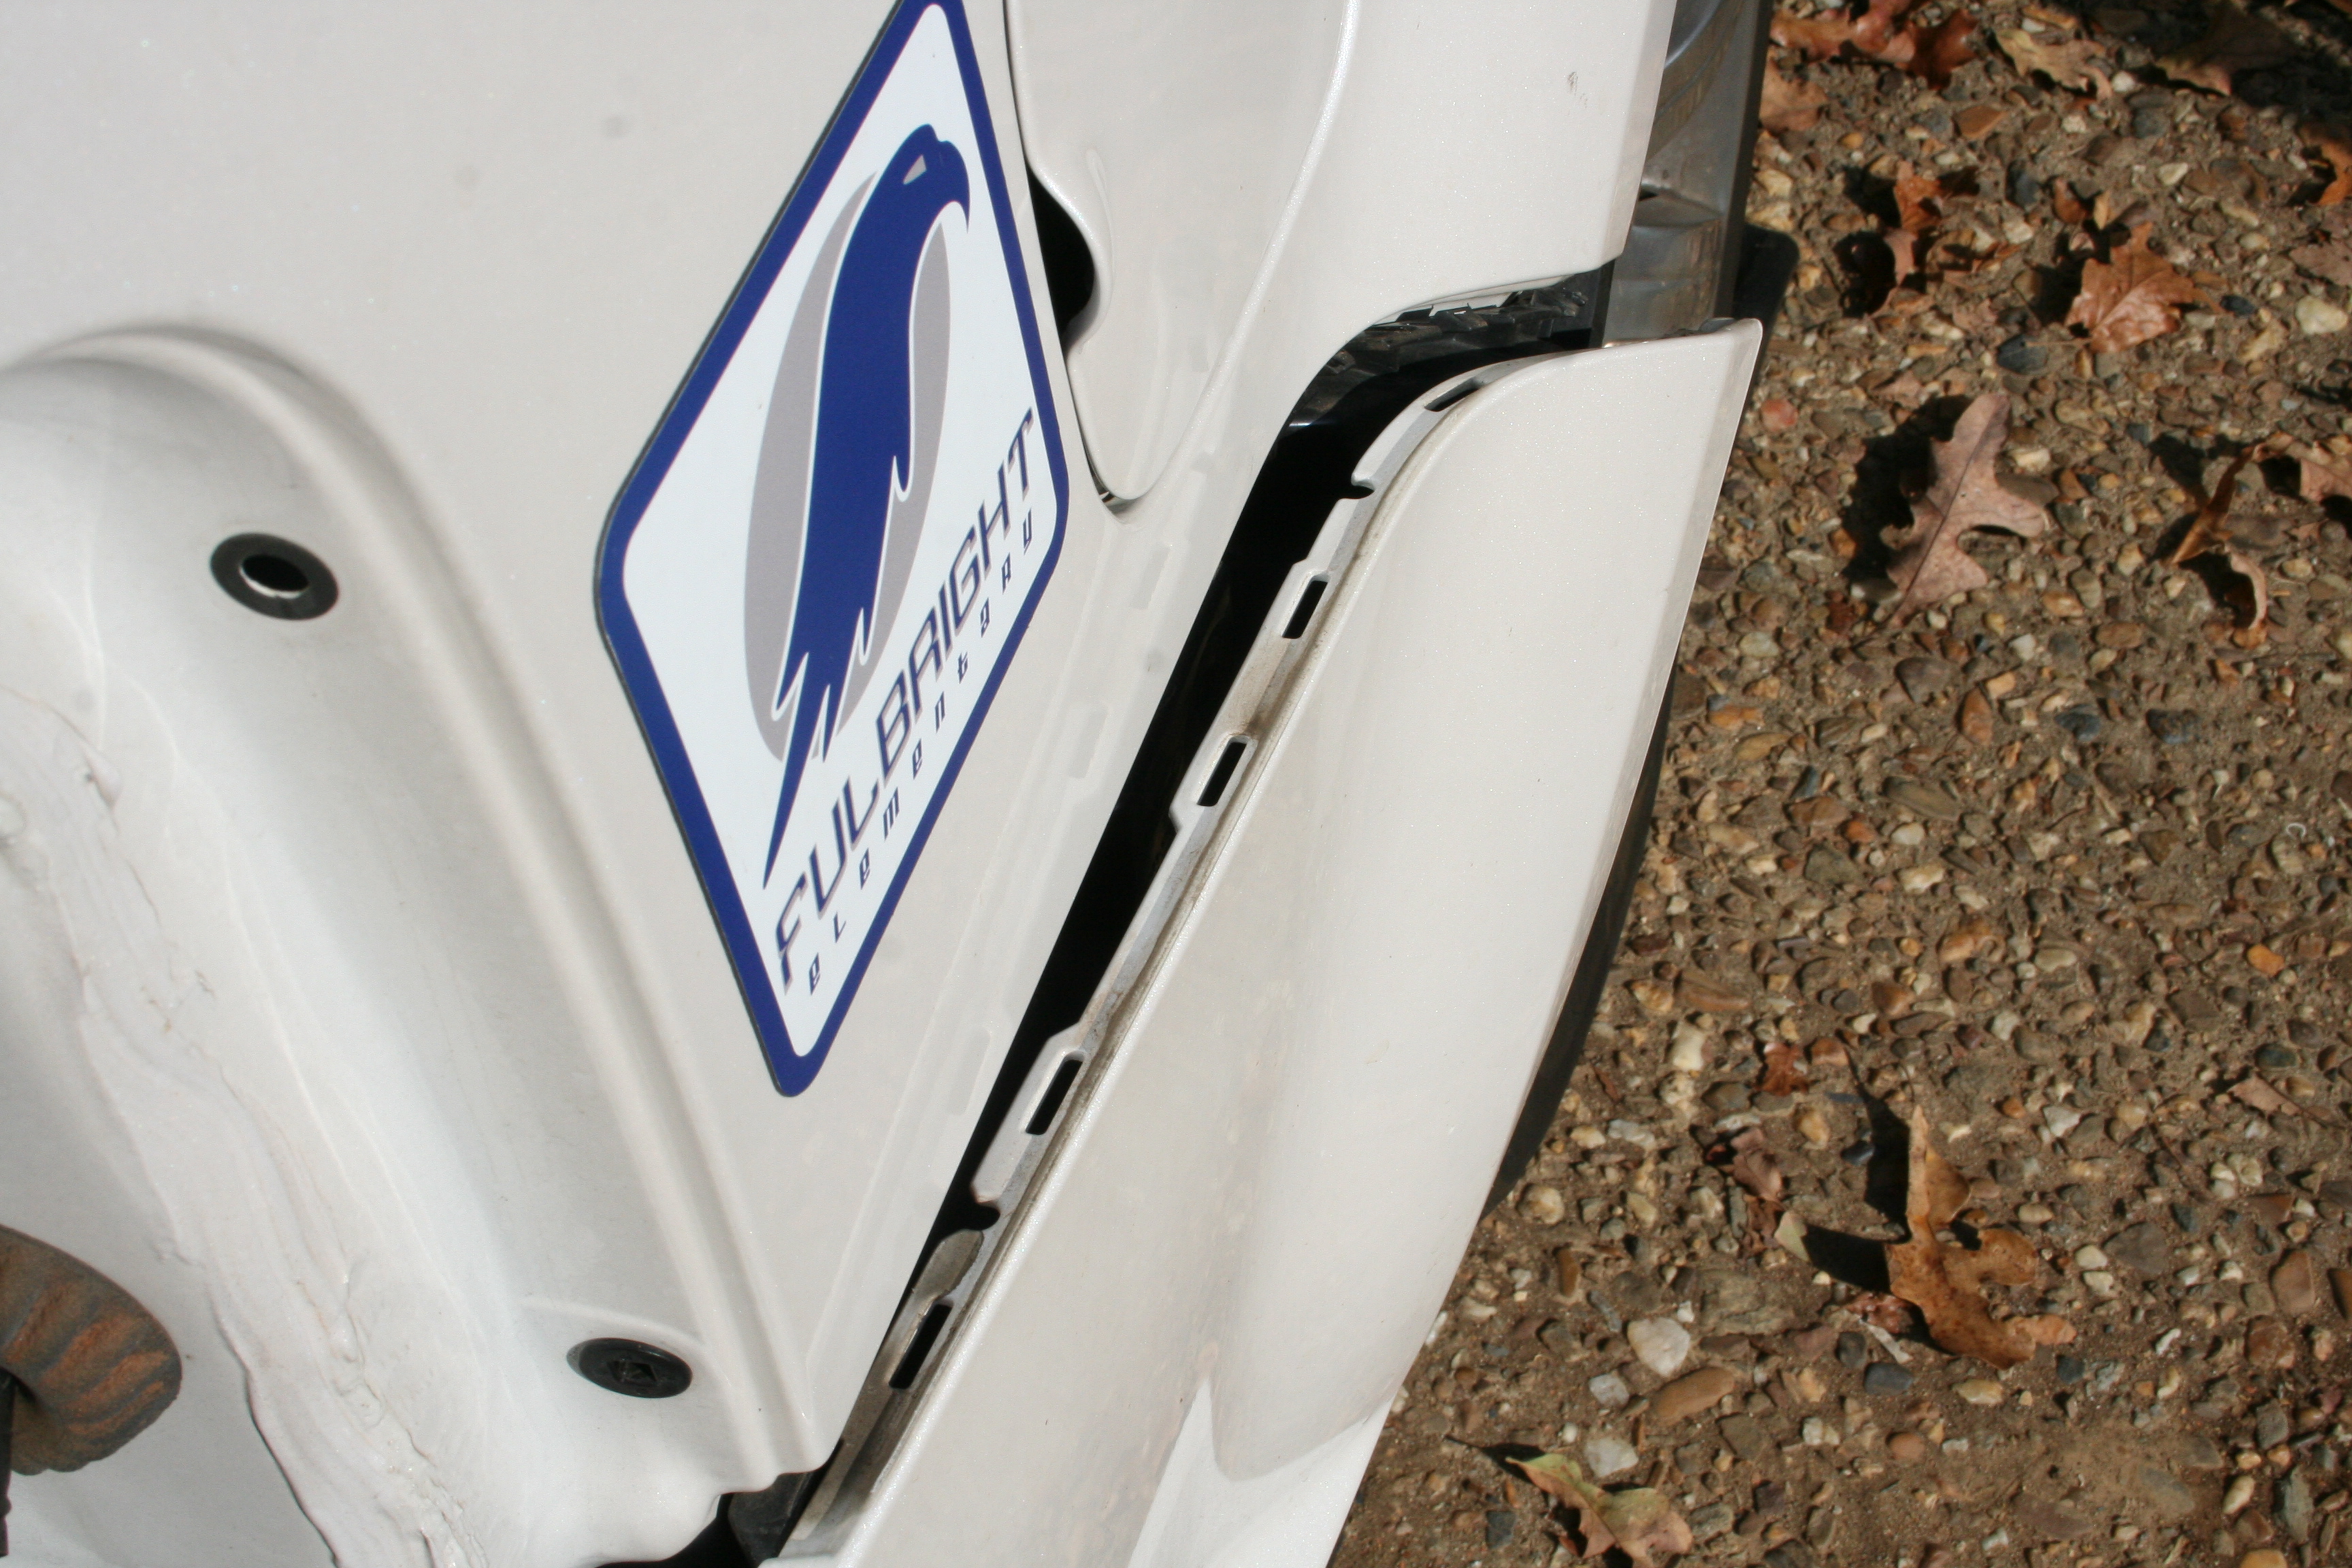
 - Grab the bumper at the ends by the rear wheels on each side and pull out and up. Use a little more force than pulling a thorn out of your hand and less force than rip starting a balky lawnmower.
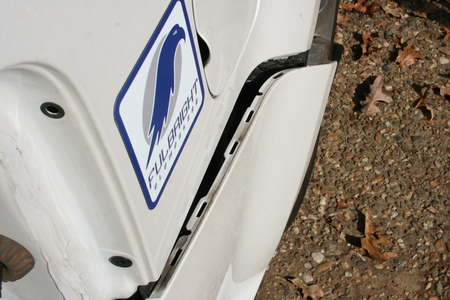
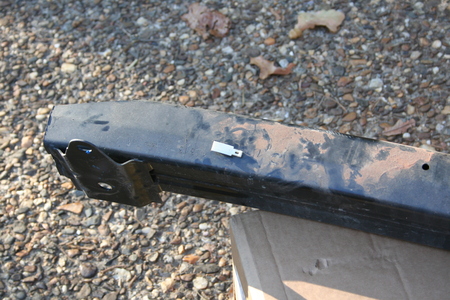
- The last step needed to free the bumper is to pry the bumper from the tab right underneath the taillight bay. I used a small pry bar, a large flat bladed screwdriver would probably have worked.

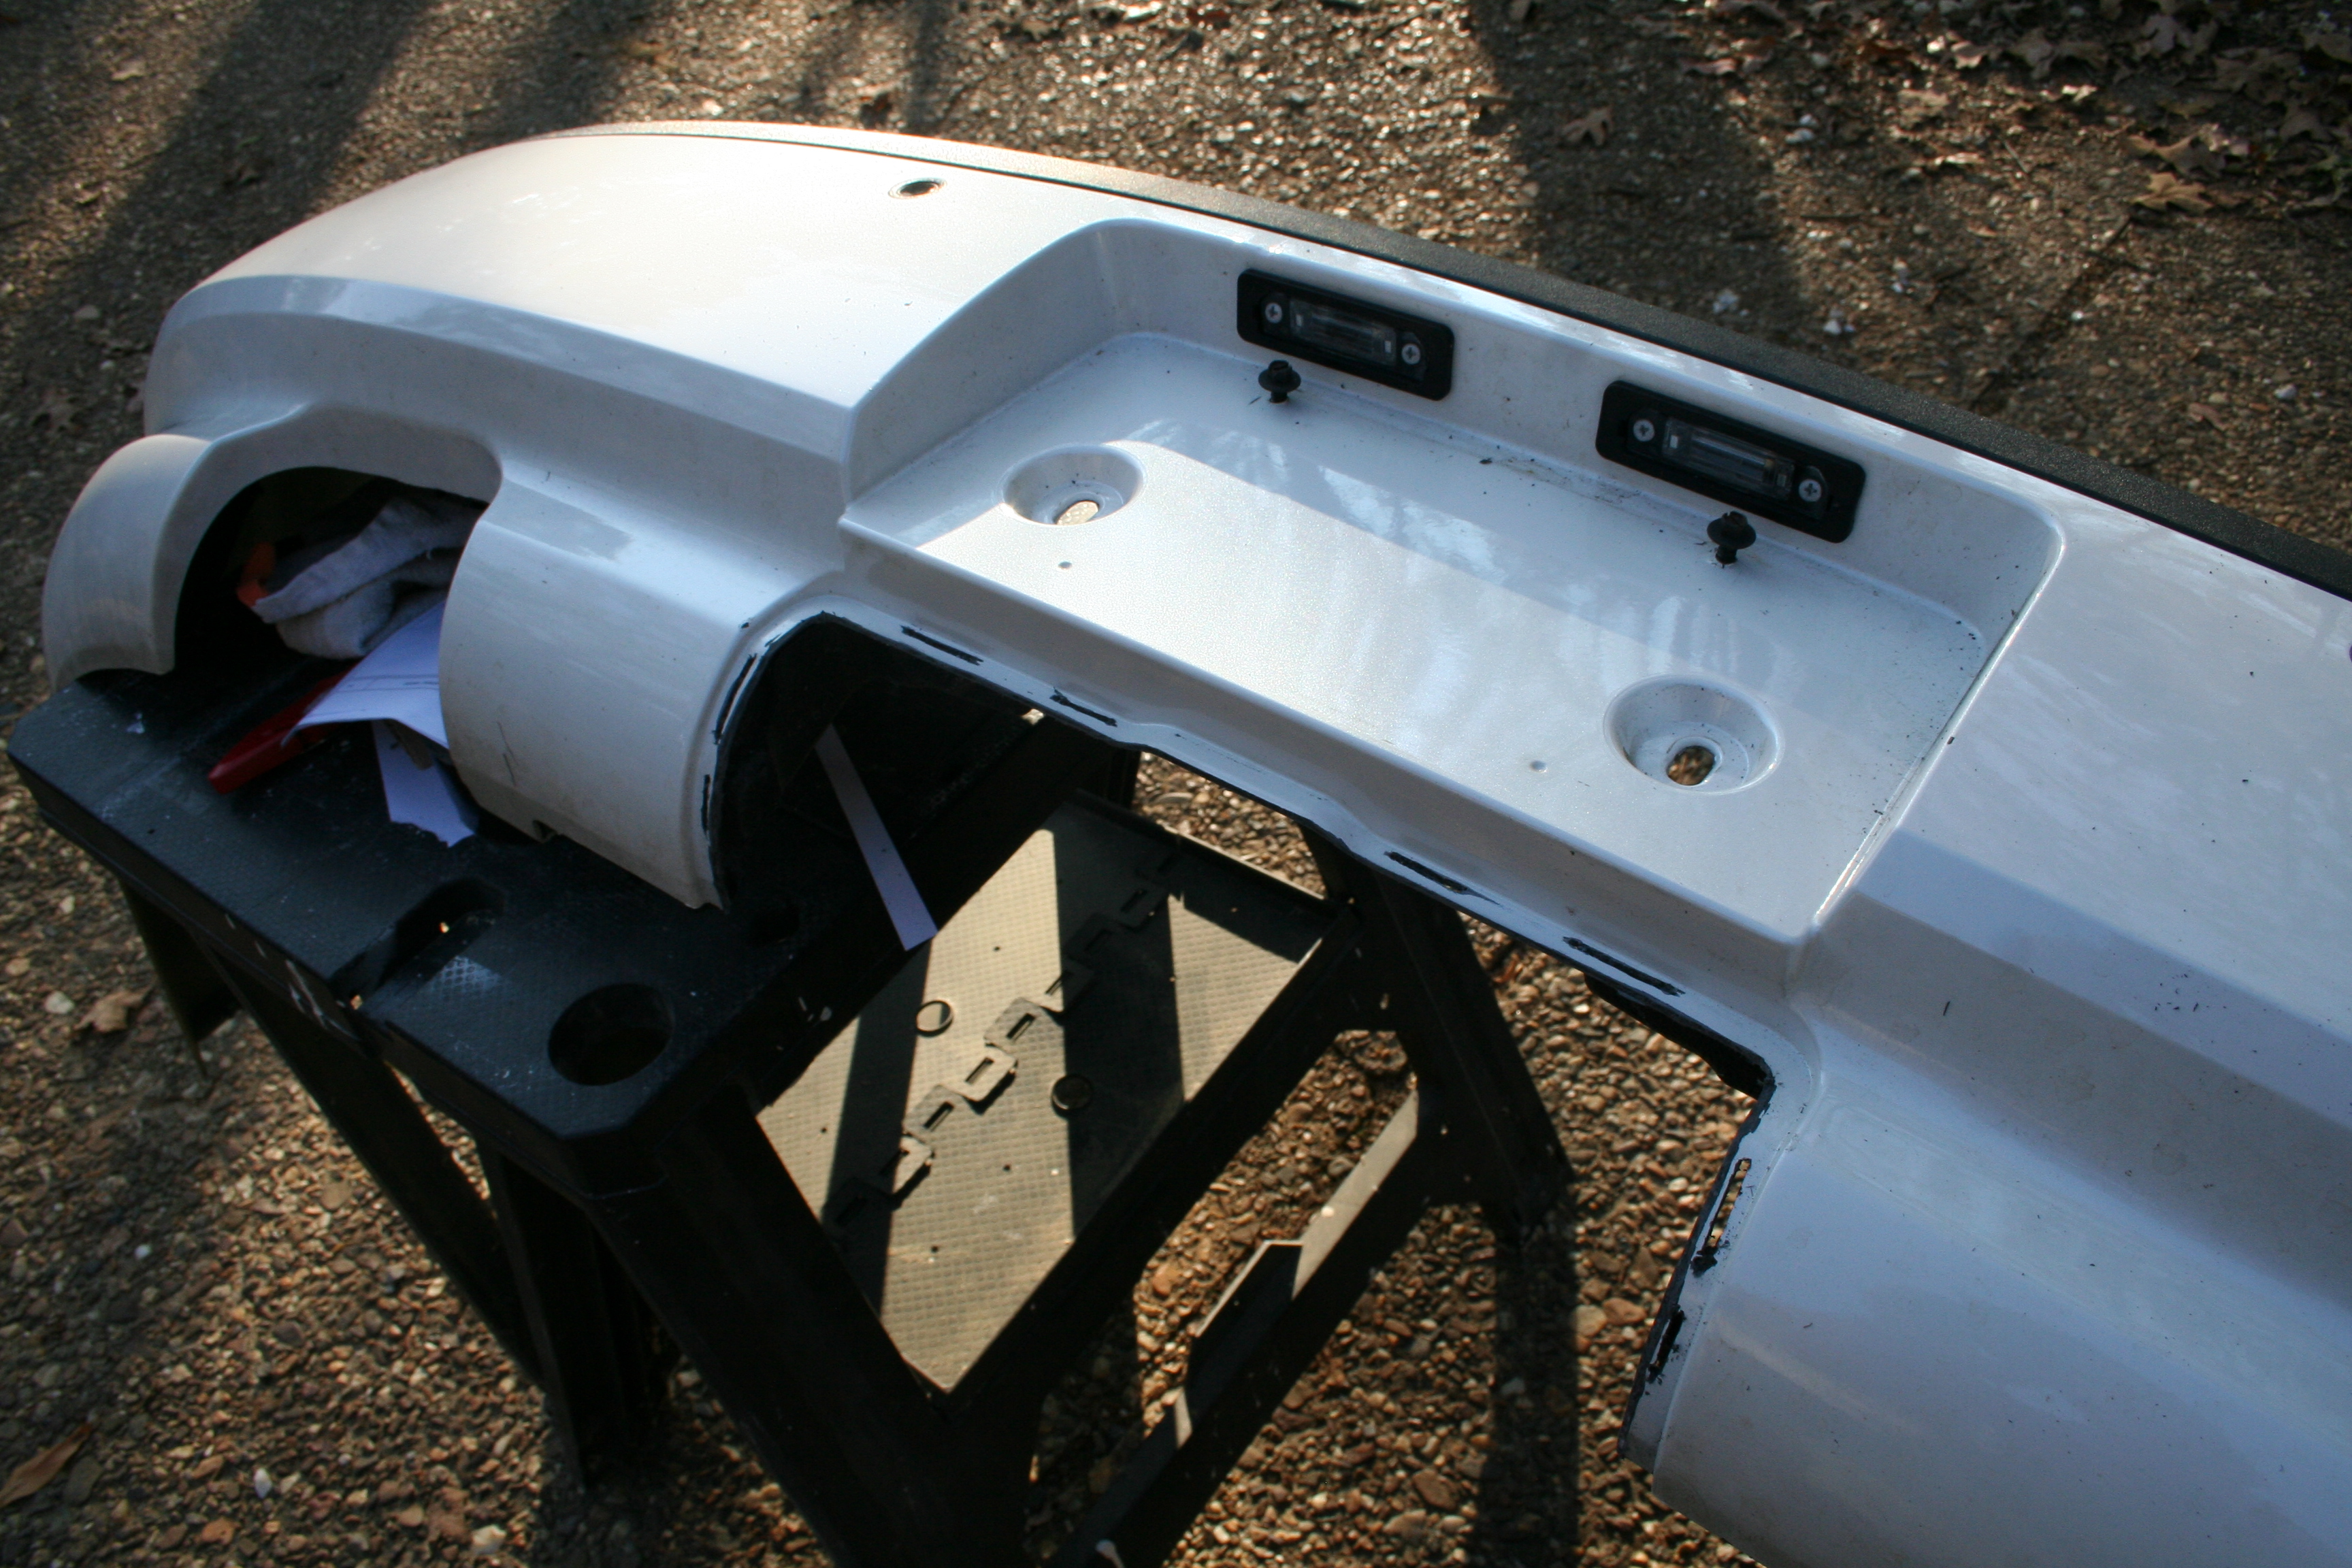
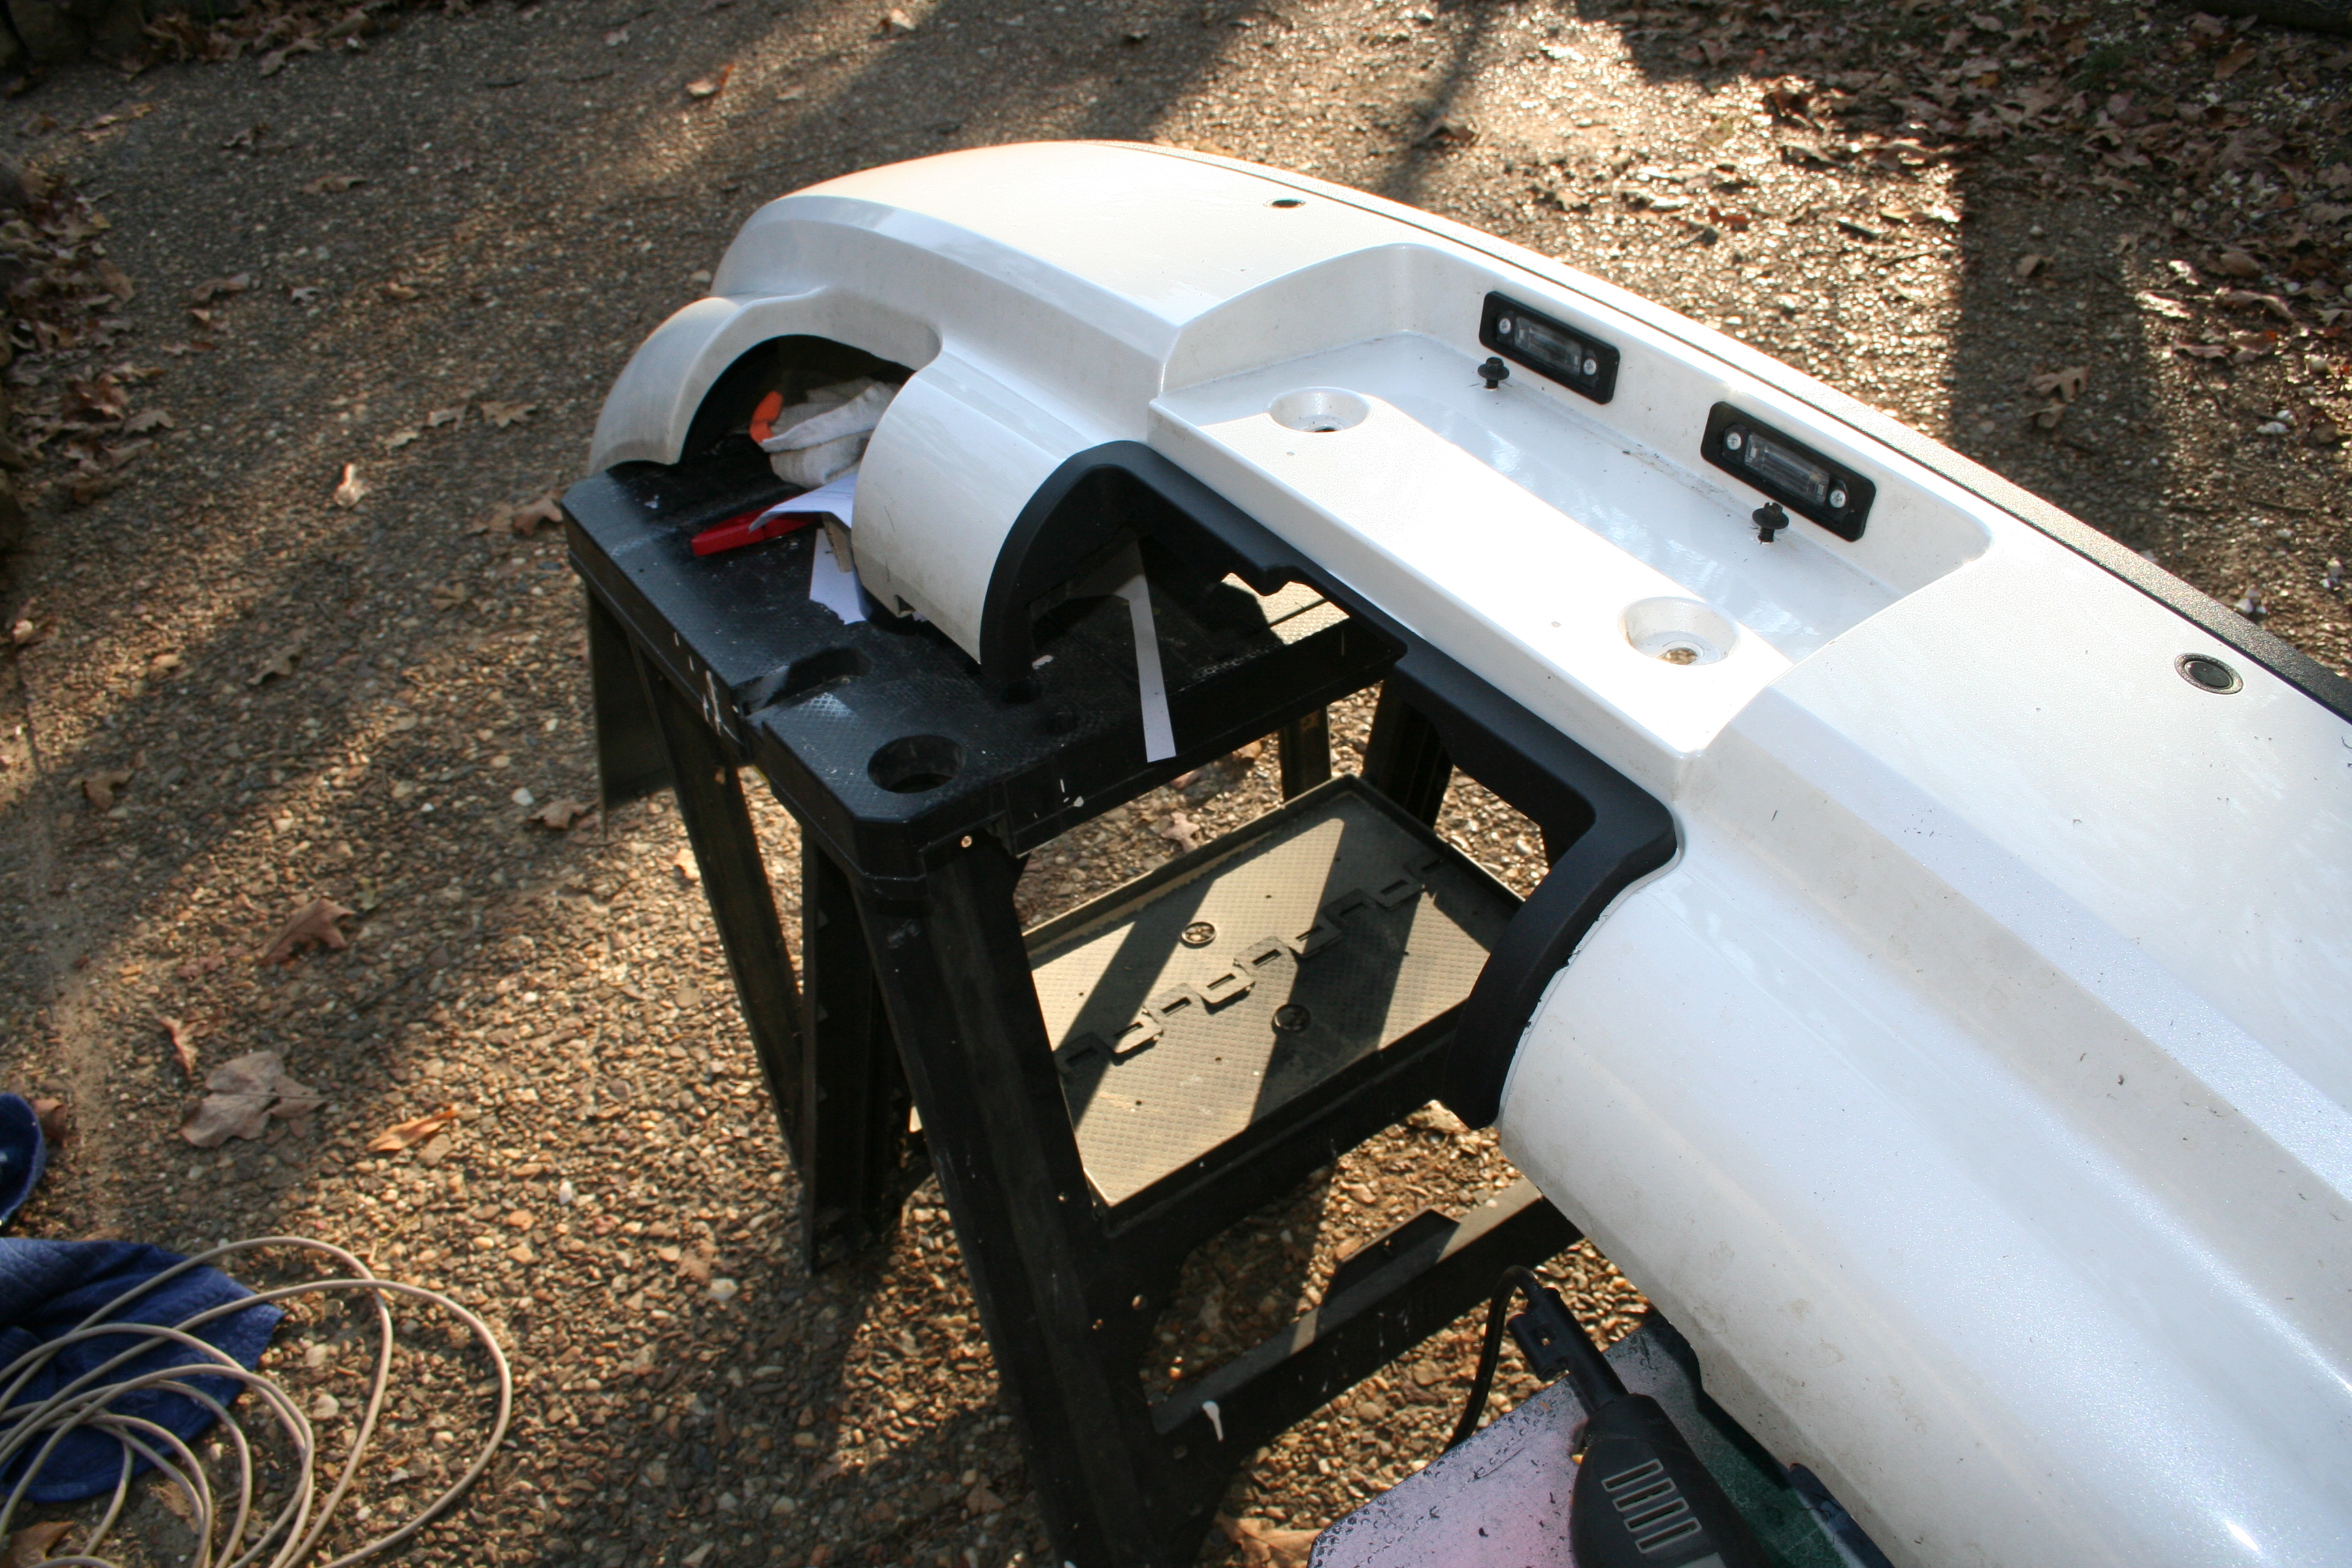
- Carefully pull the bumper away from the rear of the car. There is a wiring harness that connects the rear parking aid sensors and license plate lamps. There is a retaining clip that holds the harness to the actual metal bumper. Release the harness from the bumper by pulling the outside of the vehicle. Find and depress the tab on the harness and pull the connectors apart.

- The entire bumper cover can now be removed and set aside.
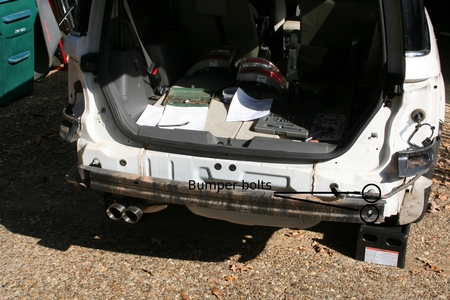
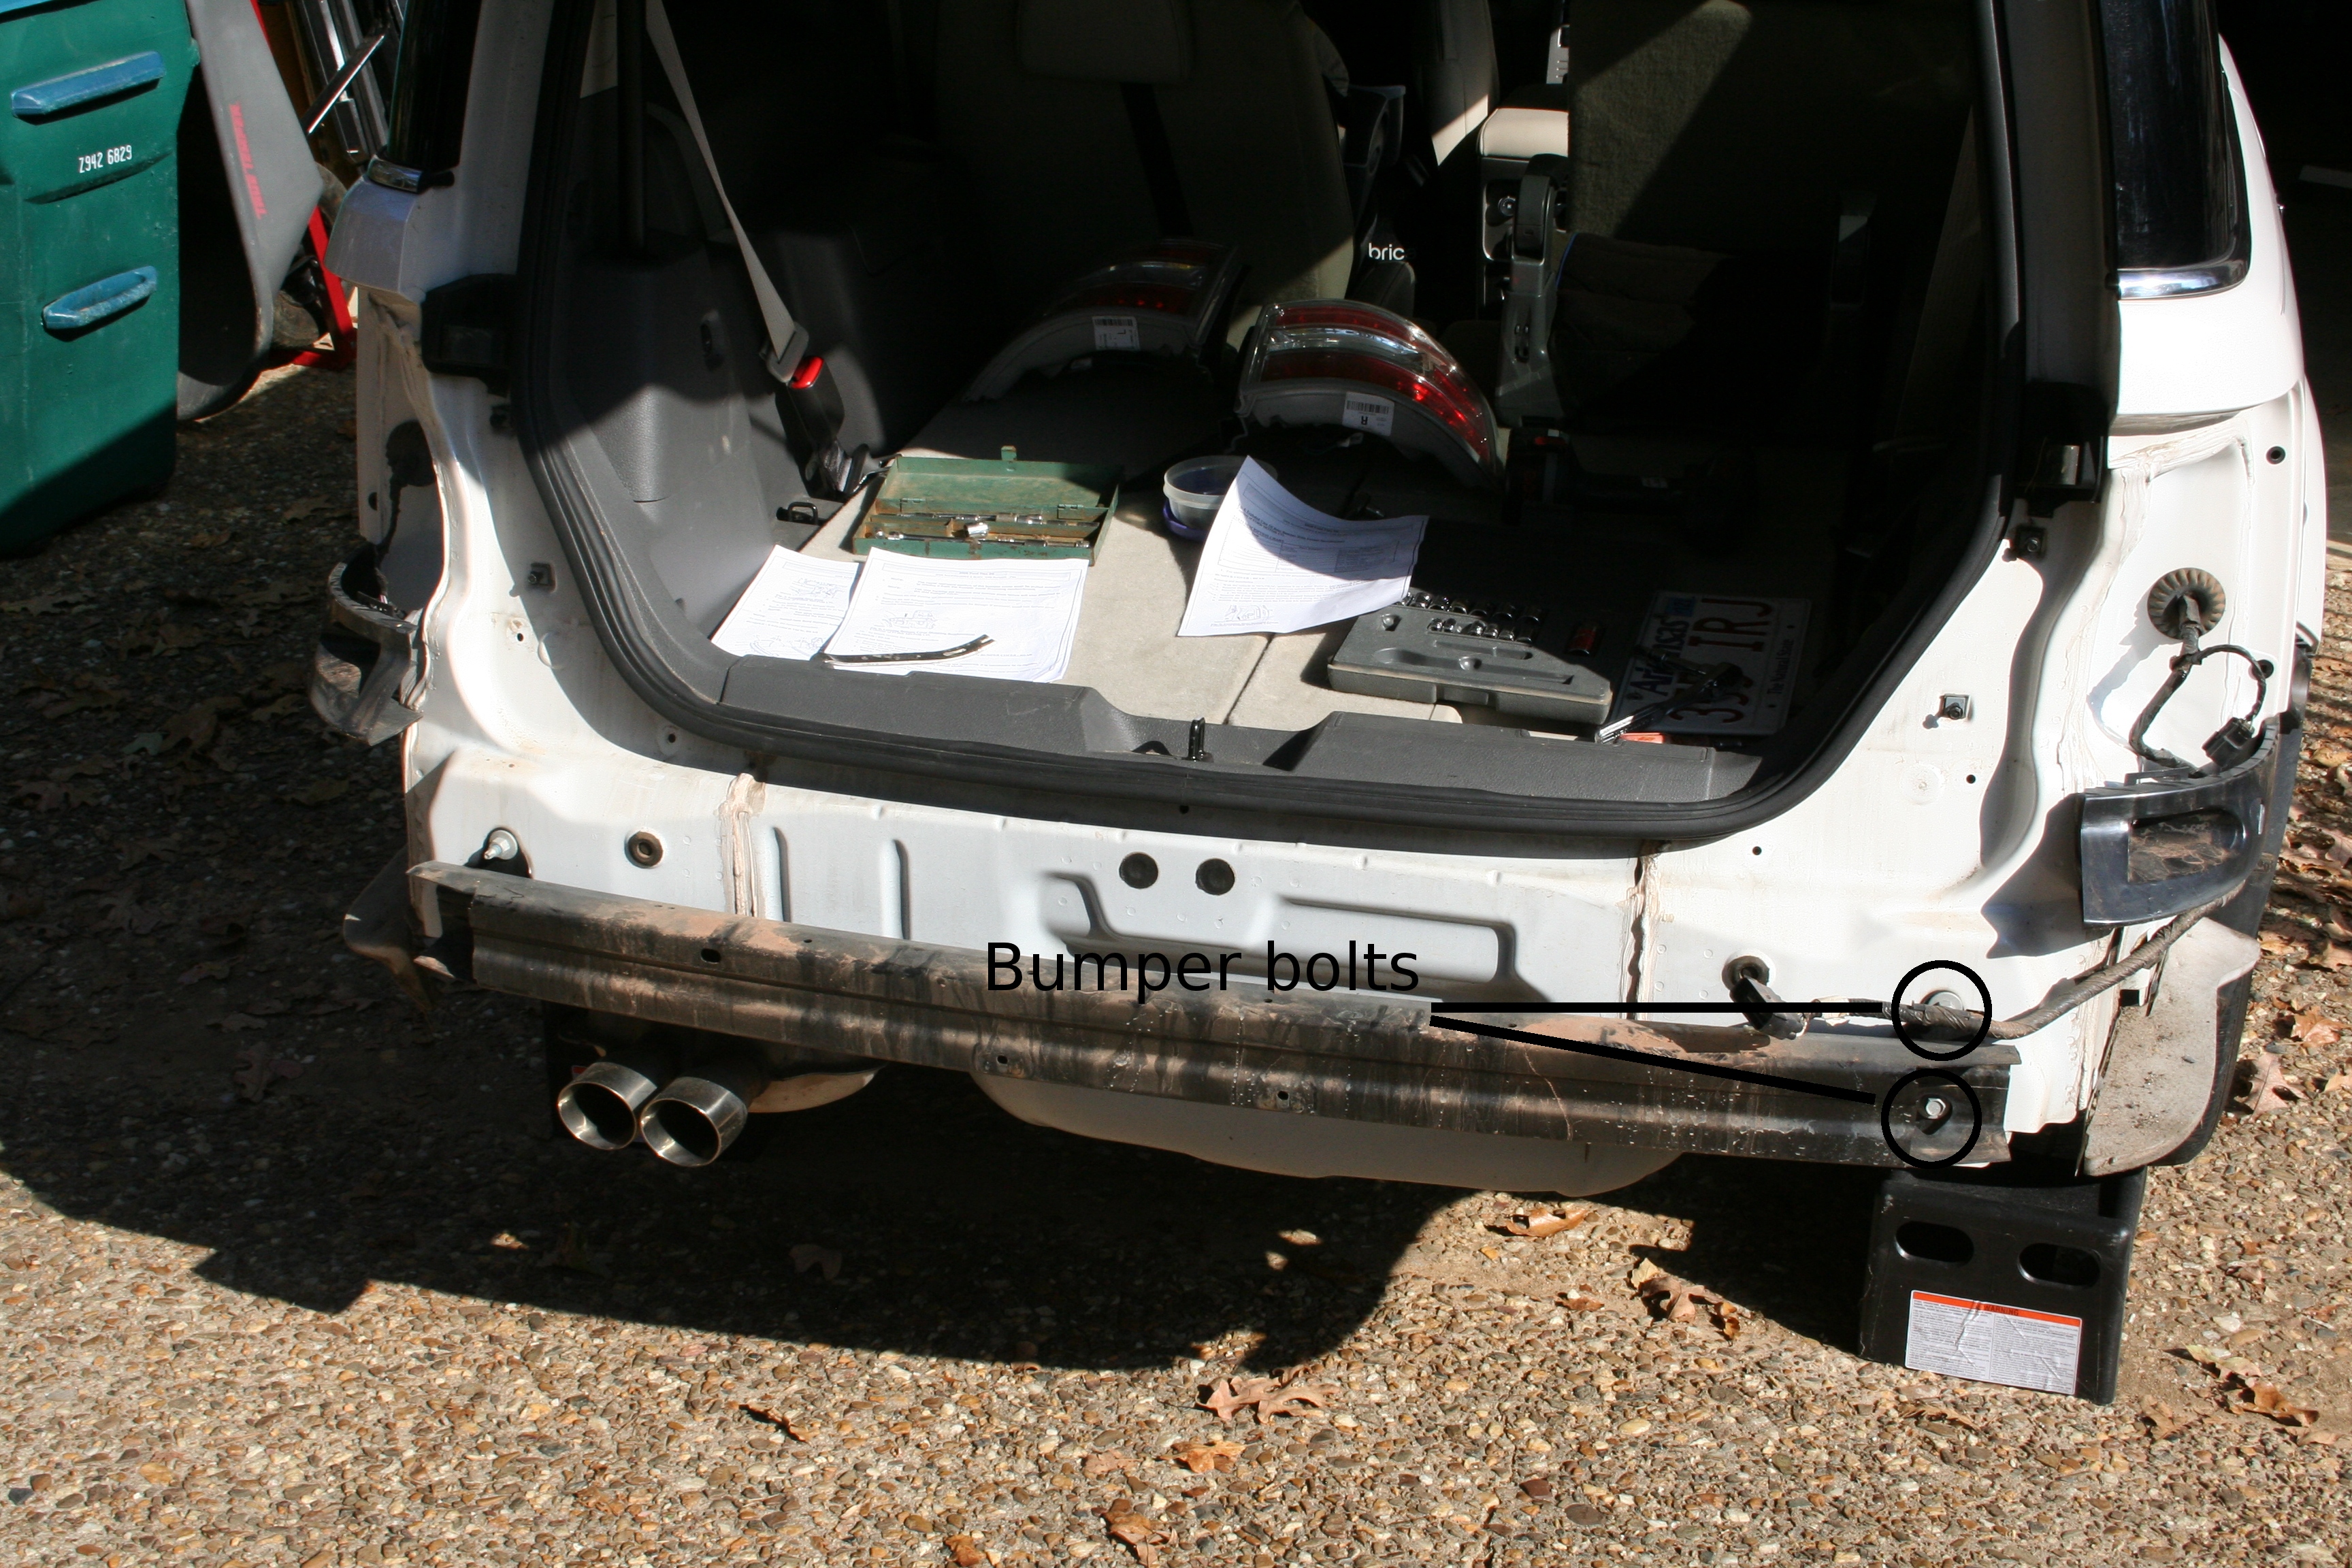
- Unbolt the actual bumper. The non-towing bumper is attached with 4 bolts, 2 on each side.
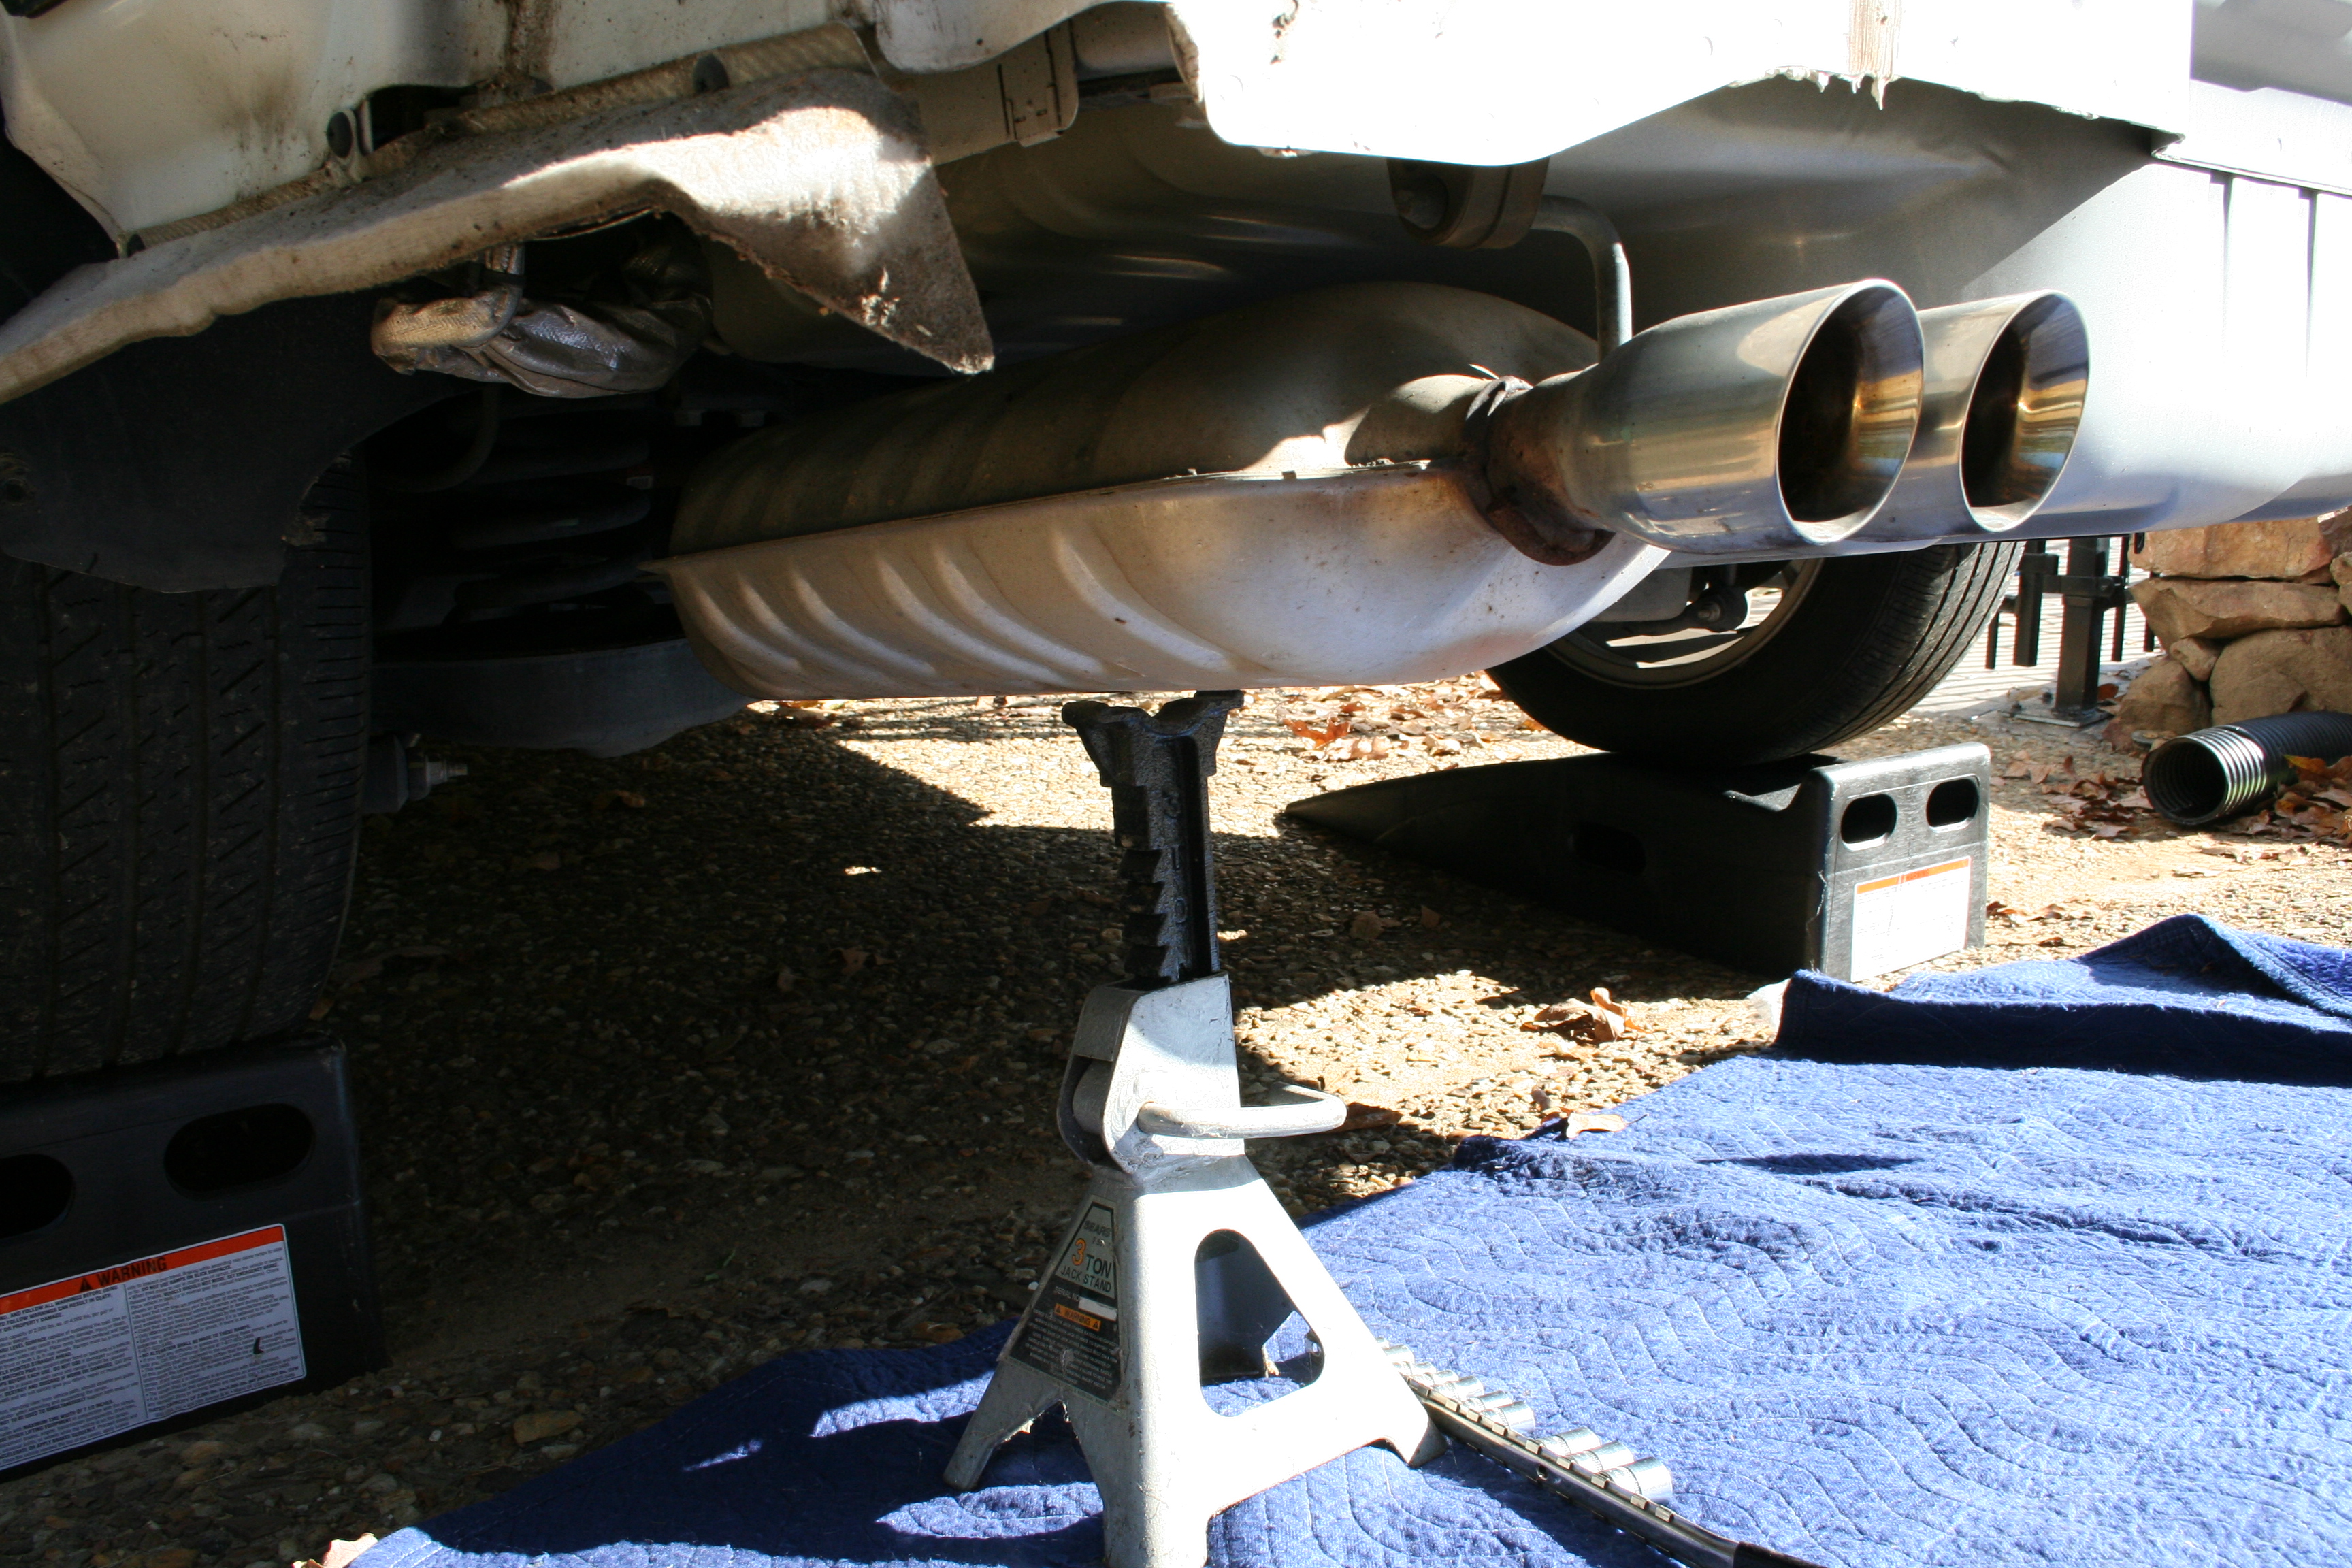
- Remove the exhaust hanger. Dual exhaust folks will have to do this two times.
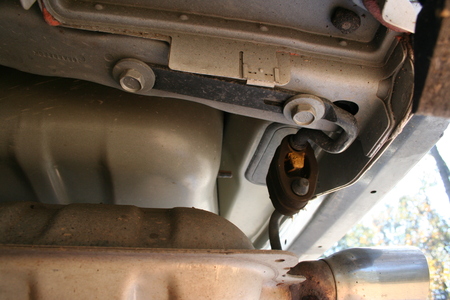 Two bolts attach the hanger to the frame and the rubber piece, “Exhaust Y-pipe isolator” can be removed by hand simply by pulling it off the post. Only pull the upper post out. Also, I supported the muffler after disconnecting it from the hanger.
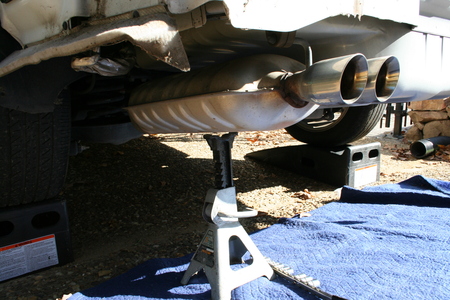
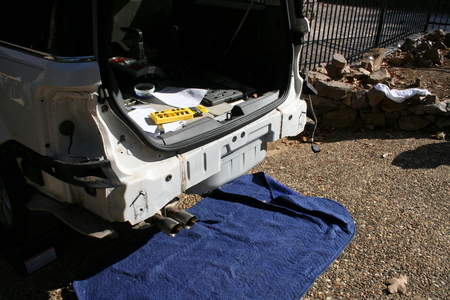
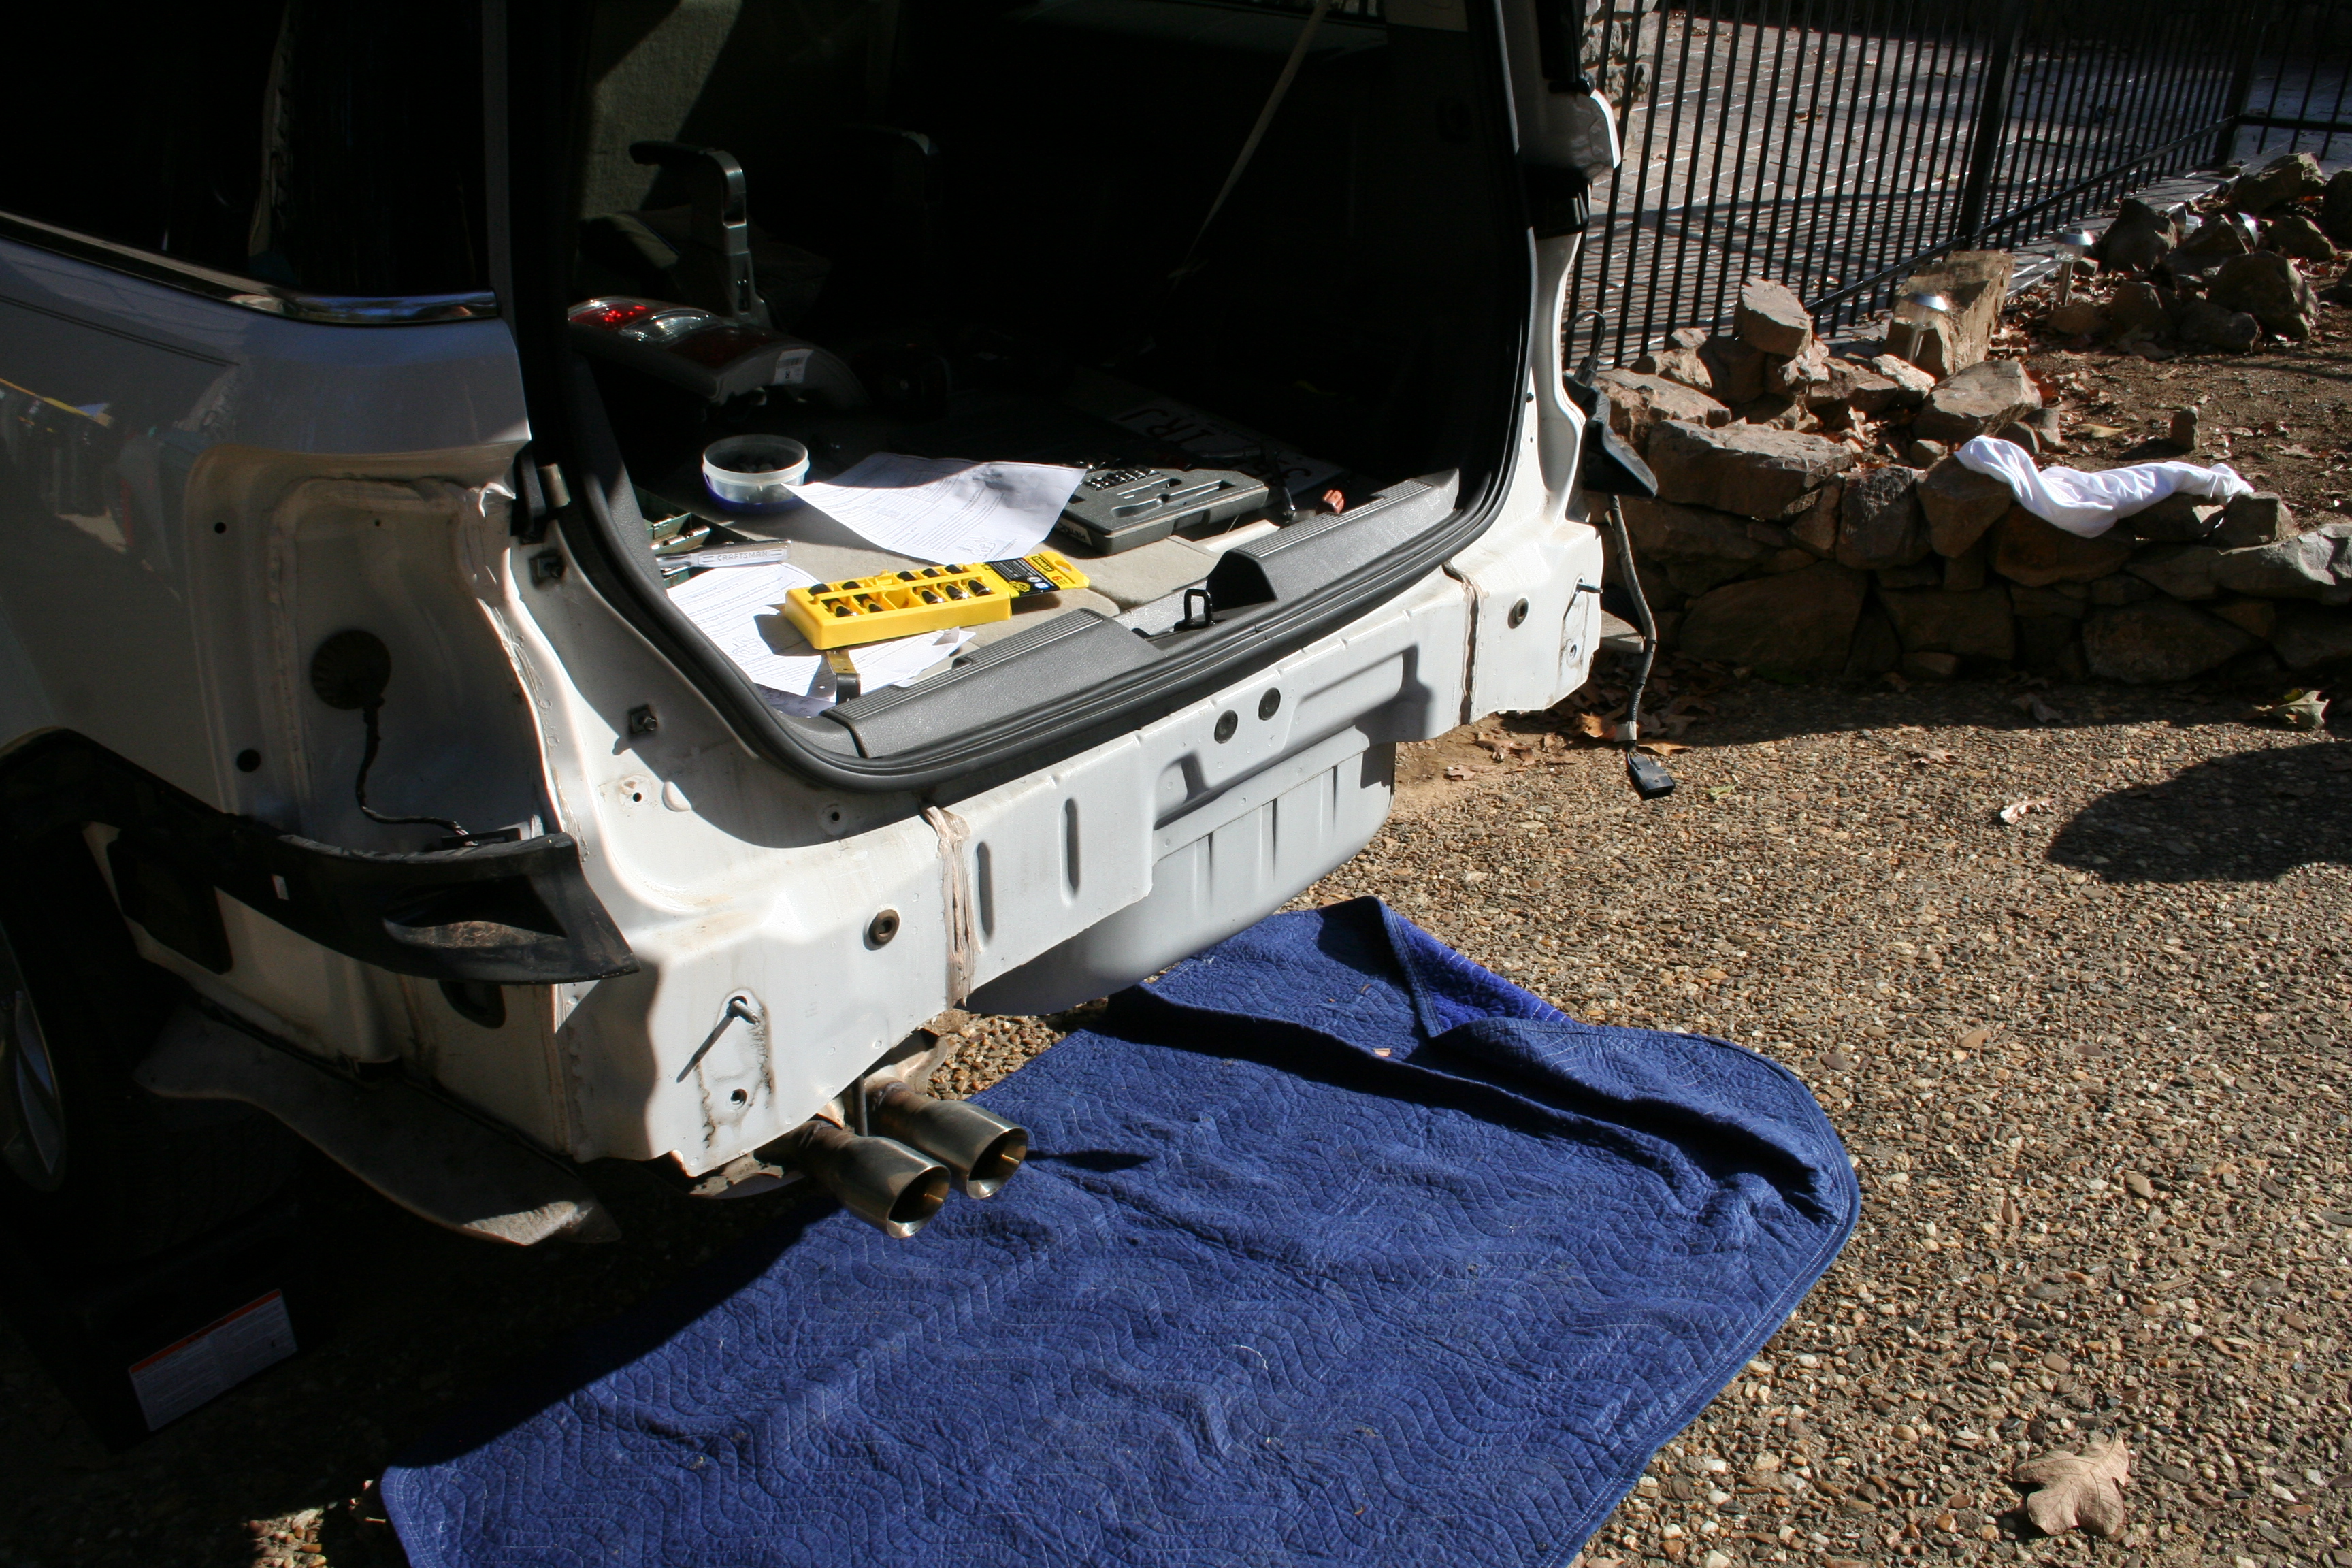
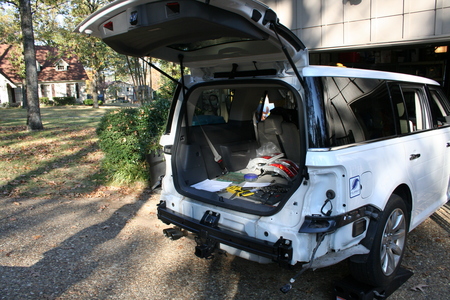
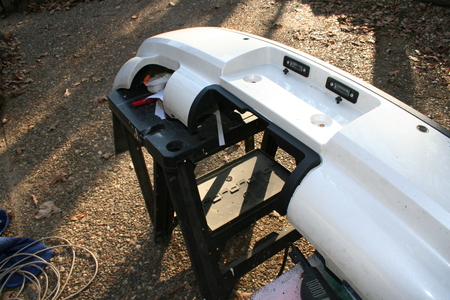
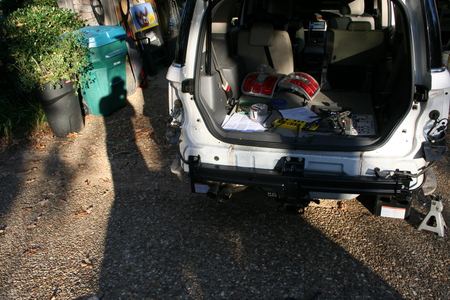
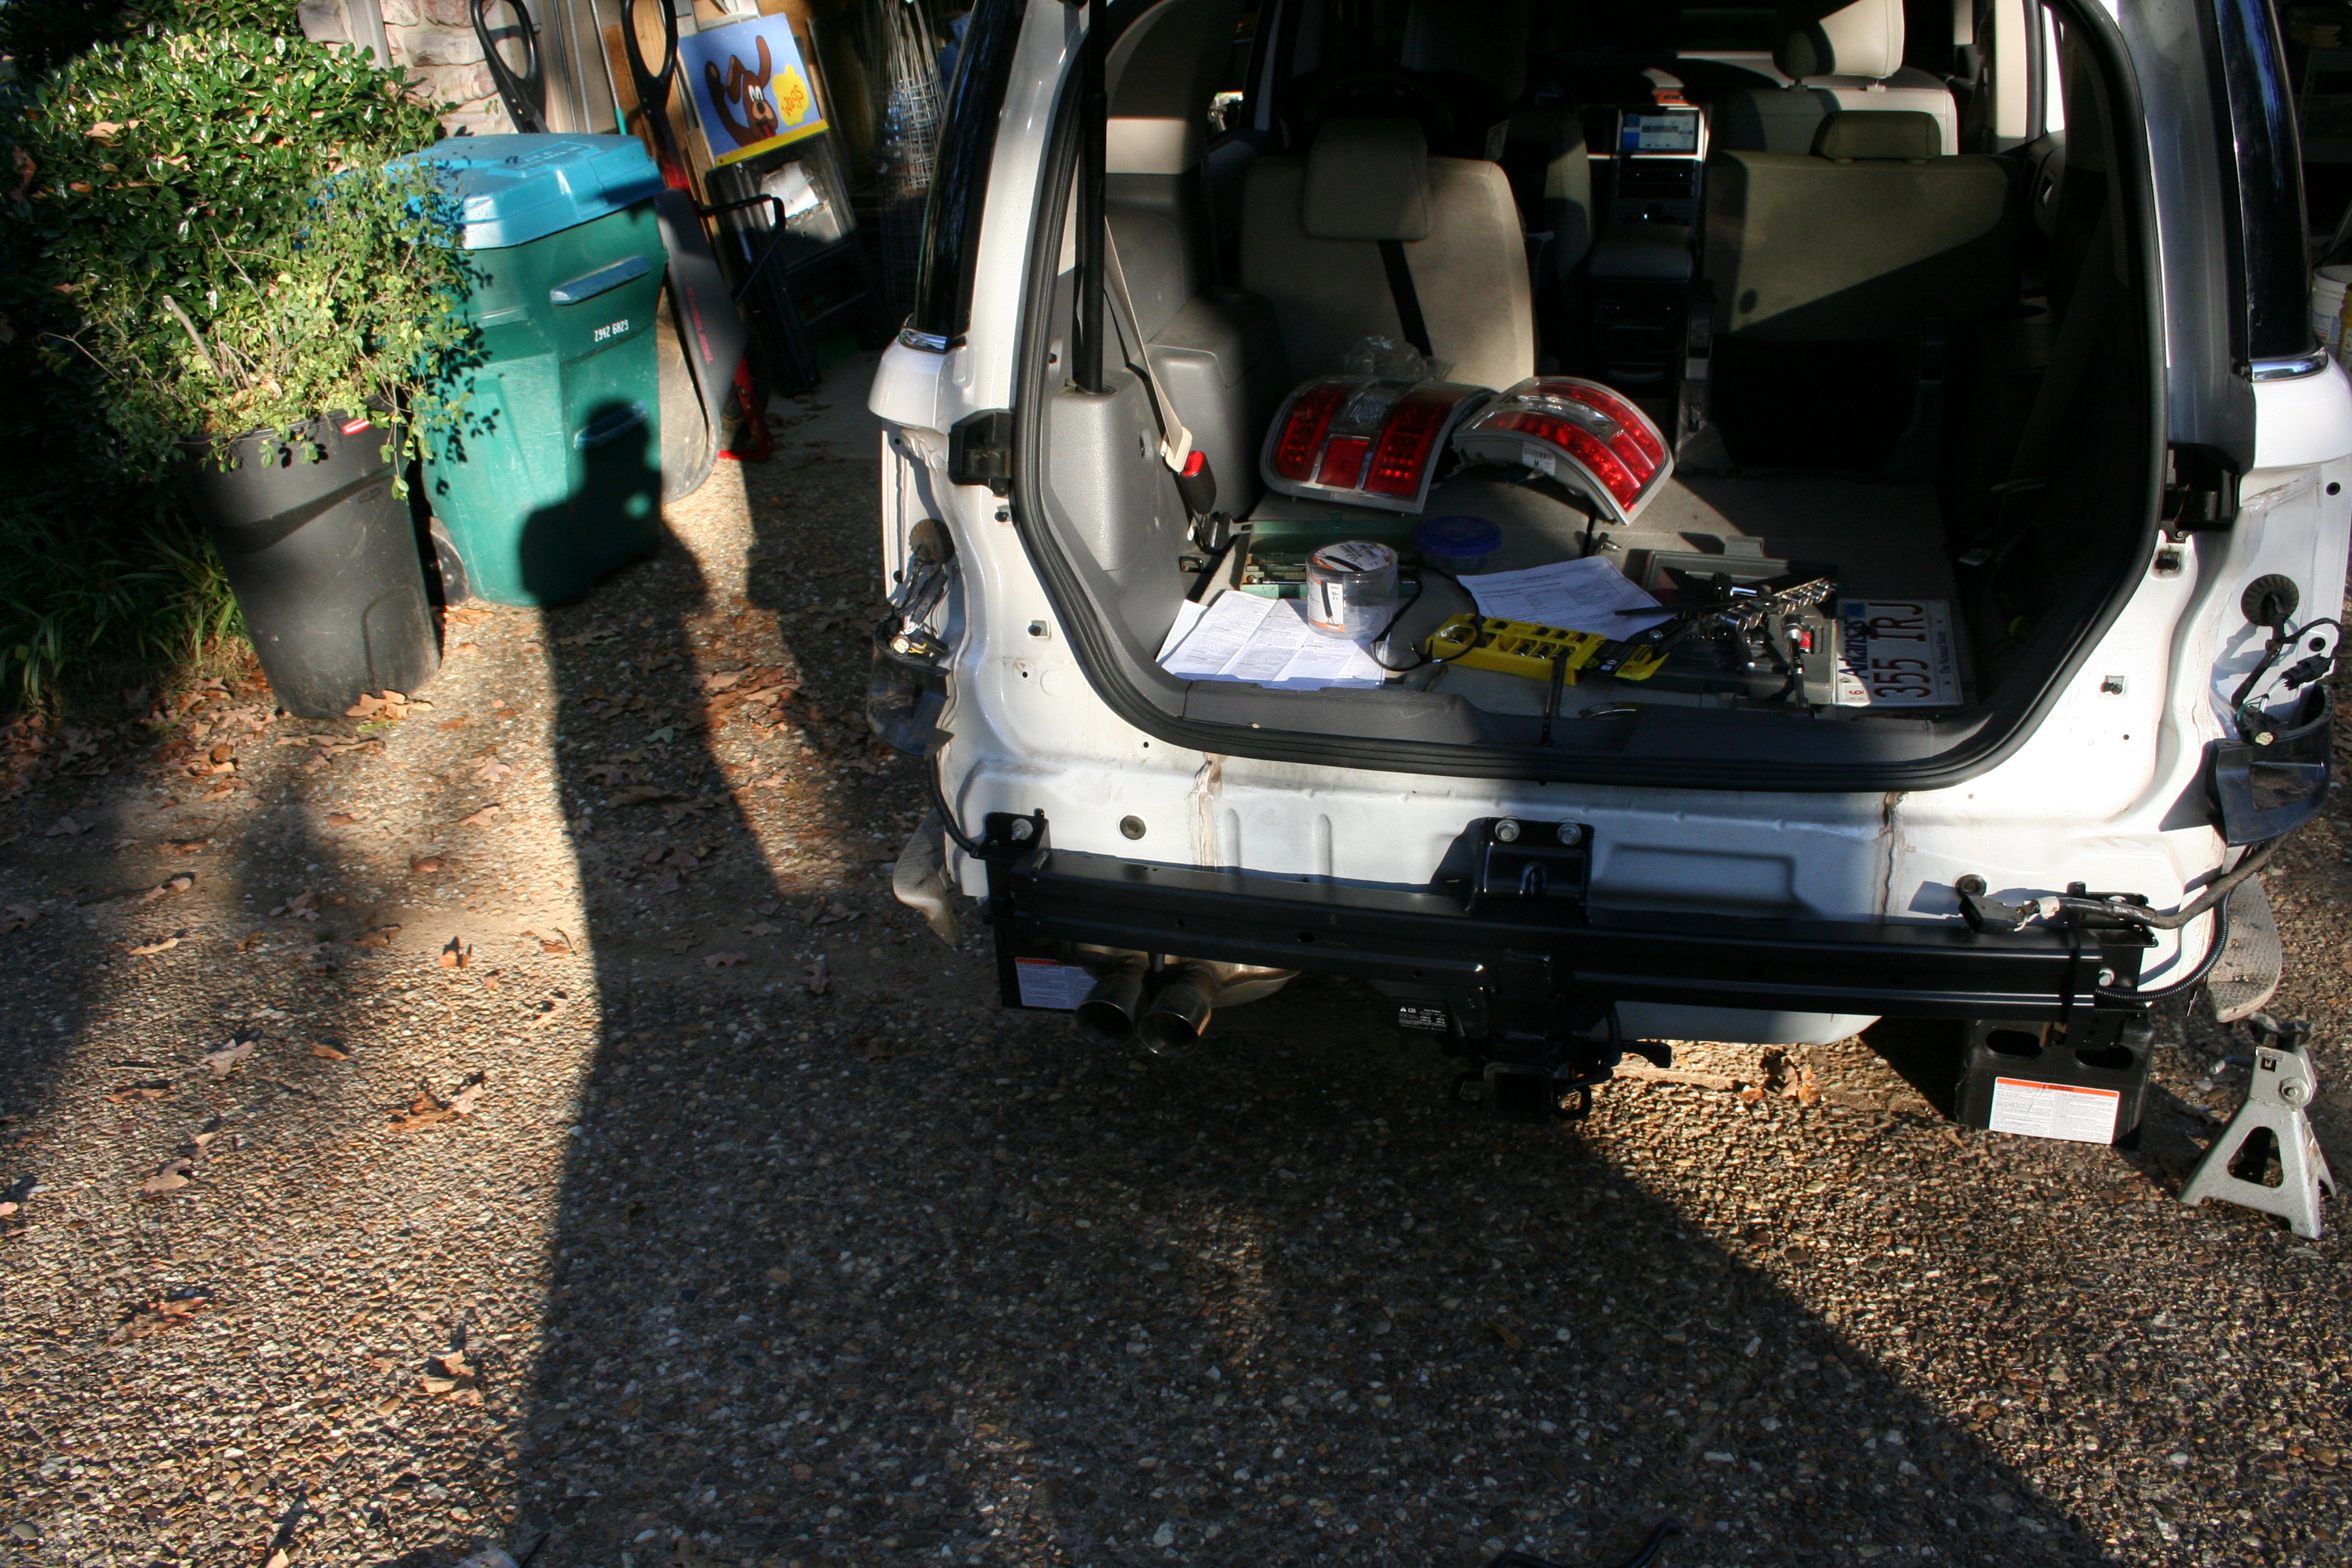
- At this point, all the things that need to be removed should be removed. If you are following along at home, the back of your Flex should look something like this:


Part 2: Hitch install
- After all the work in tear down, this part goes pretty fast. There are two black stickers covering the as-yet unused bolt holes directly underneath the tailgate latch that need to be removed. BONUS HINT: I ended up running the trailer wiring through the bumper. There is an opening in the back of the bumper, right behind the receiver where the 4-pin connector can hang down. I made the wiring location decision after I had attached the bumper, but if i was doing it again, I would route the wiring before bolting it to the vehicle. It wasn’t very difficult to route the wiring after the fact, but it would be much easier to do it beforehand. There is a left and right hand side to the trailer wiring- the wires themselves are color coded to make it easy to make sure it is routed correctly.
- To install, line the new bumper with hitch receiver up with the bumper studs on the rear of the car. This wasn’t too difficult for me to do by myself, but two people would be fantastic. Lining up the bumper to the studs is easy, the trick is getting the brackets that attach to the underneath of the car in place without getting caught up in the exhaust.

- Attach the bumper to the rear of the vehicle, reattaching at the four old location and using two more bolts directly beneath the tailgate latch. The instructions are specific on which bolts to use. Follow the instructions!
- There are 3 bolts on each side to tighten underneath the vehicle. Getting all 3 installed took me a couple different combinations of deep well sockets and socket extension.
 The third horizontal bolt definitely needed a socket extension on the side with mufflers.
- Reattach the rubber isolator to support the muffler.
- From the old bumper, remove the wiring harness retainer by gently prying and or fishing it loose with a pair of pliers.
 Press in place on new bumper, keeping the same orientation as the original.
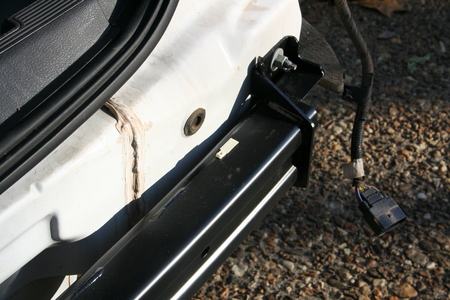
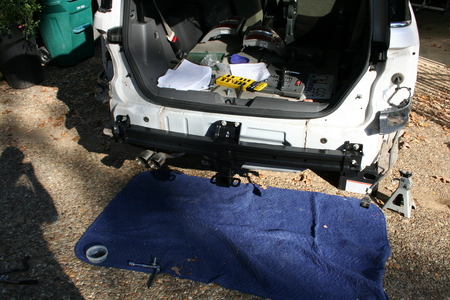
- The hitch bumper is now installed. For the folks following along at home, your Flex should look something like this, with trailer wiring hanging out of the ends of the bumper for those who took my advice above.


Part 3: Body work!
This is the point of no return. Everything before this has been bolt-on/bolt-off stuff.
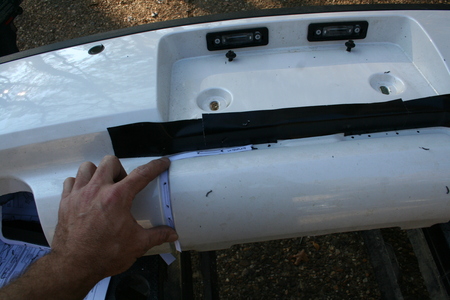
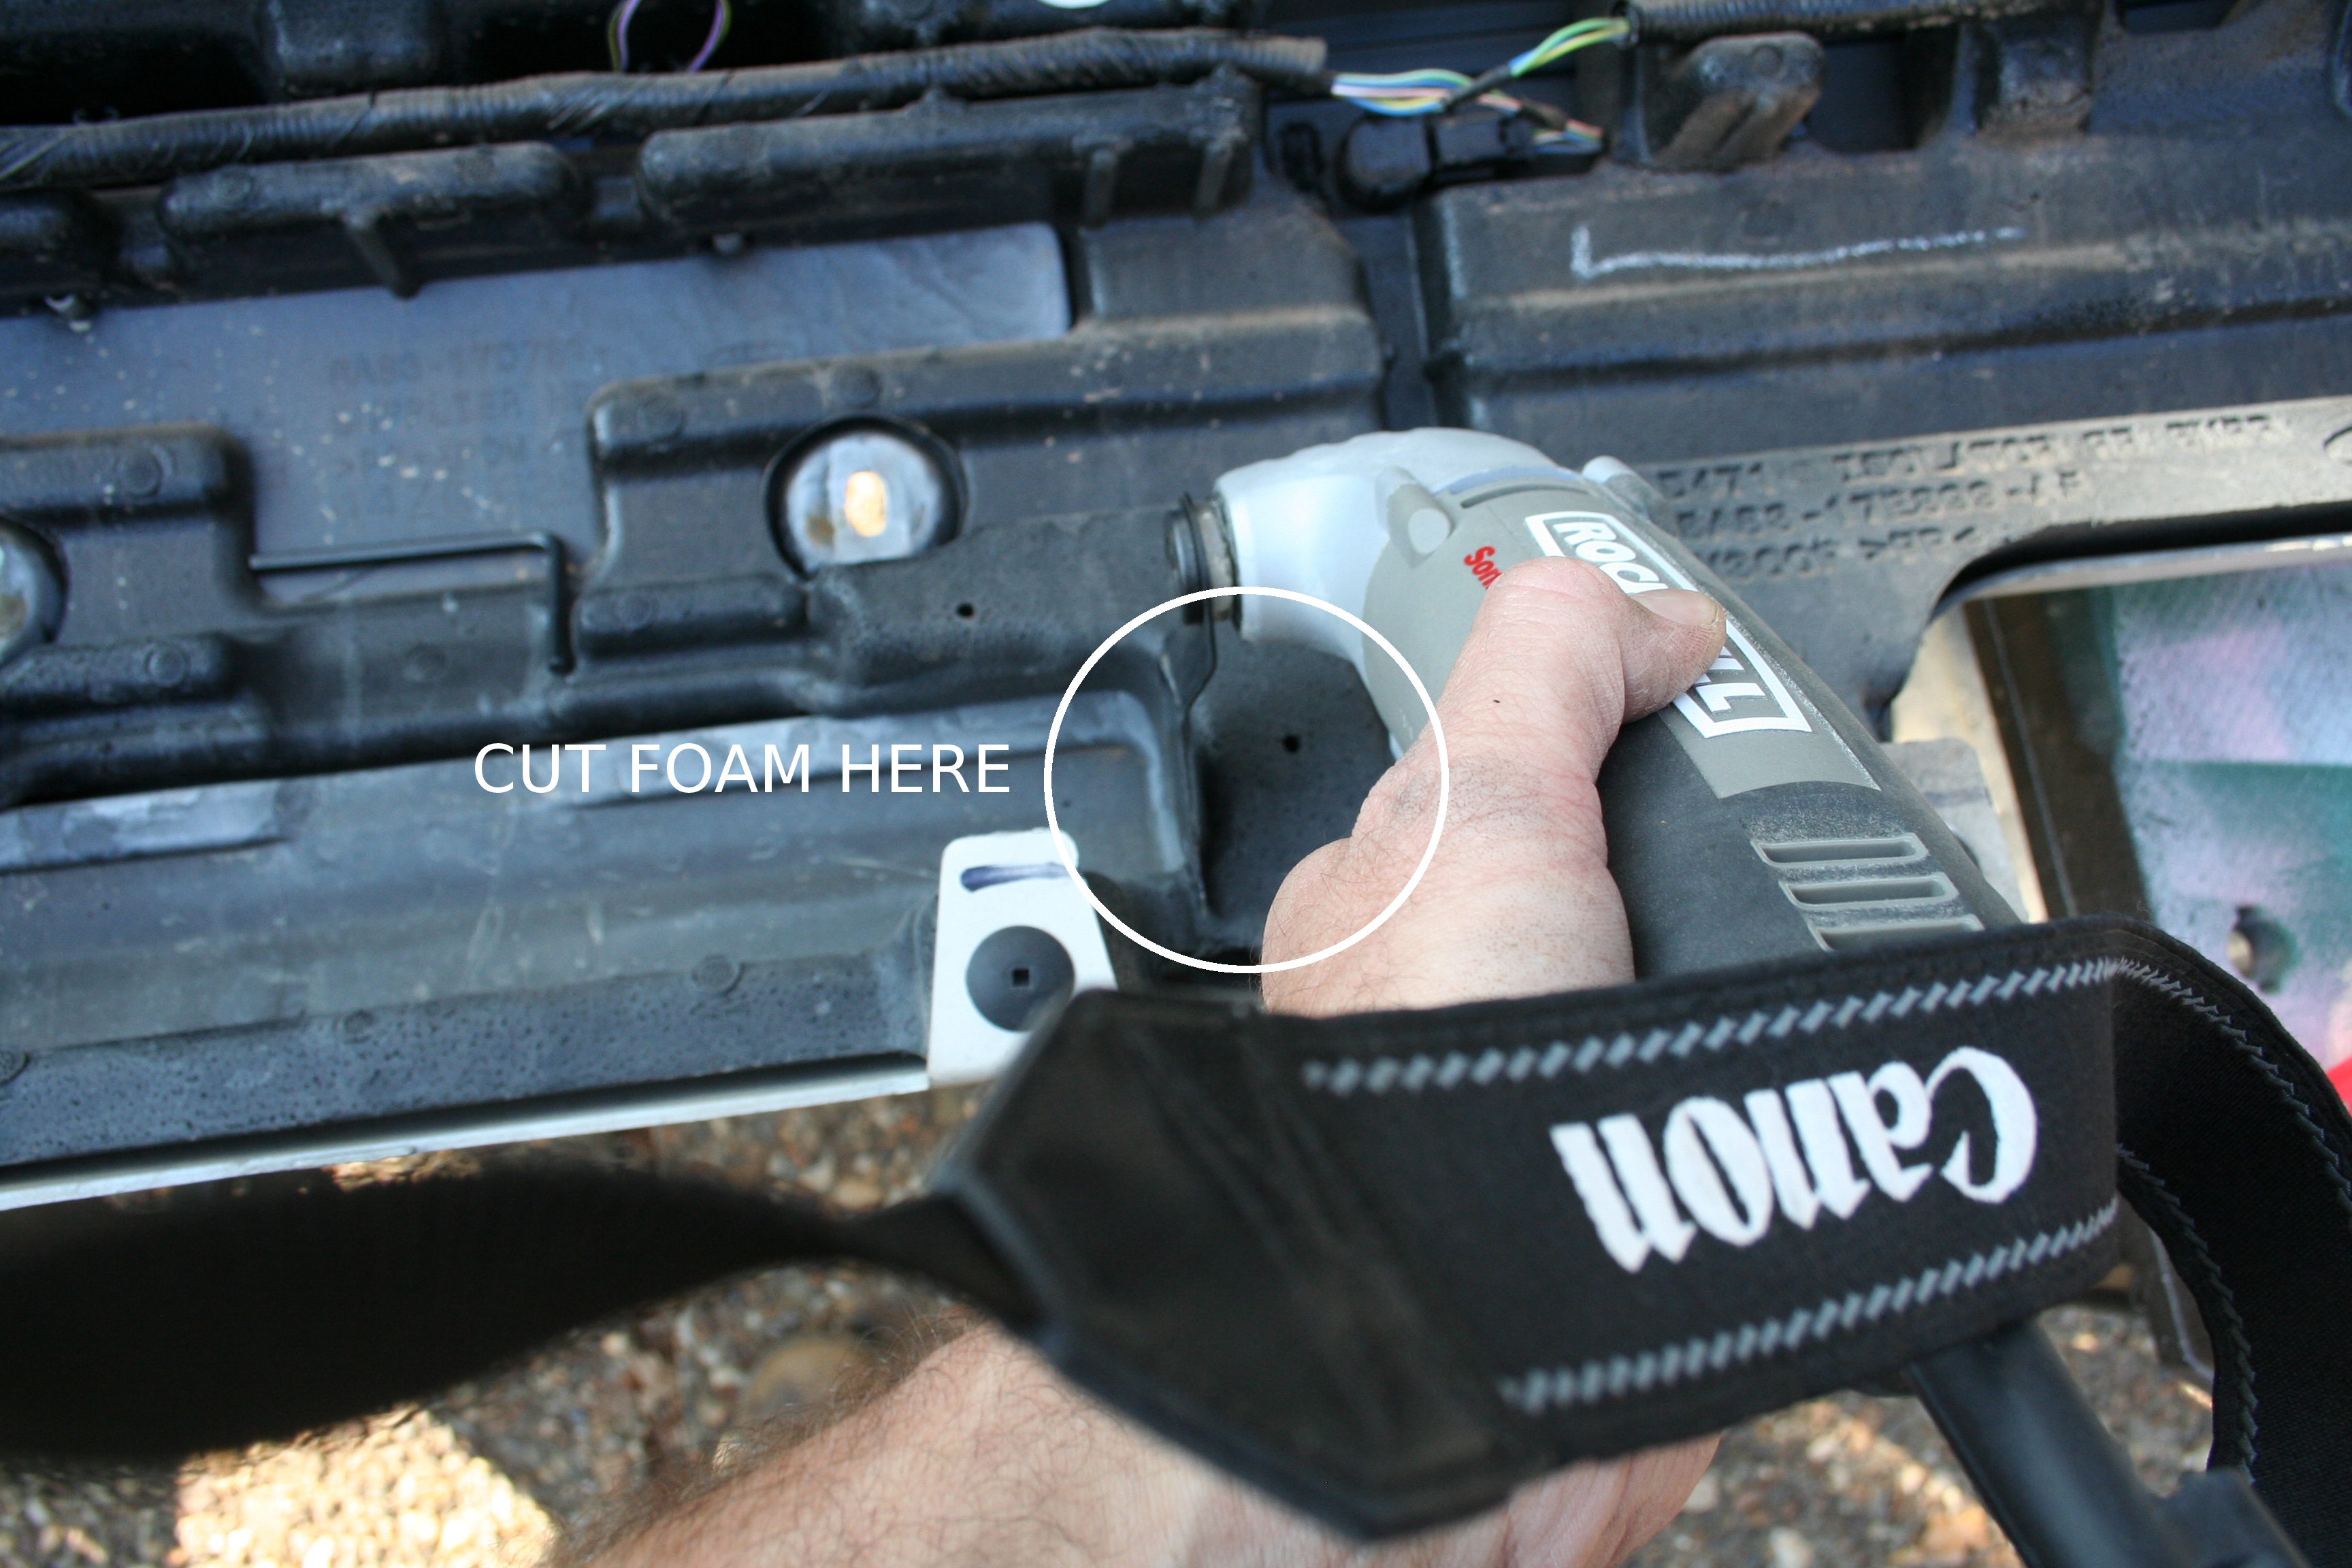
- From the backside of the bumper cover, cut the foam away from the hitch access area. The instructions included with the hitch show to locations. I used a sonicrafter to cut the foam, but a razor knife would have worked.

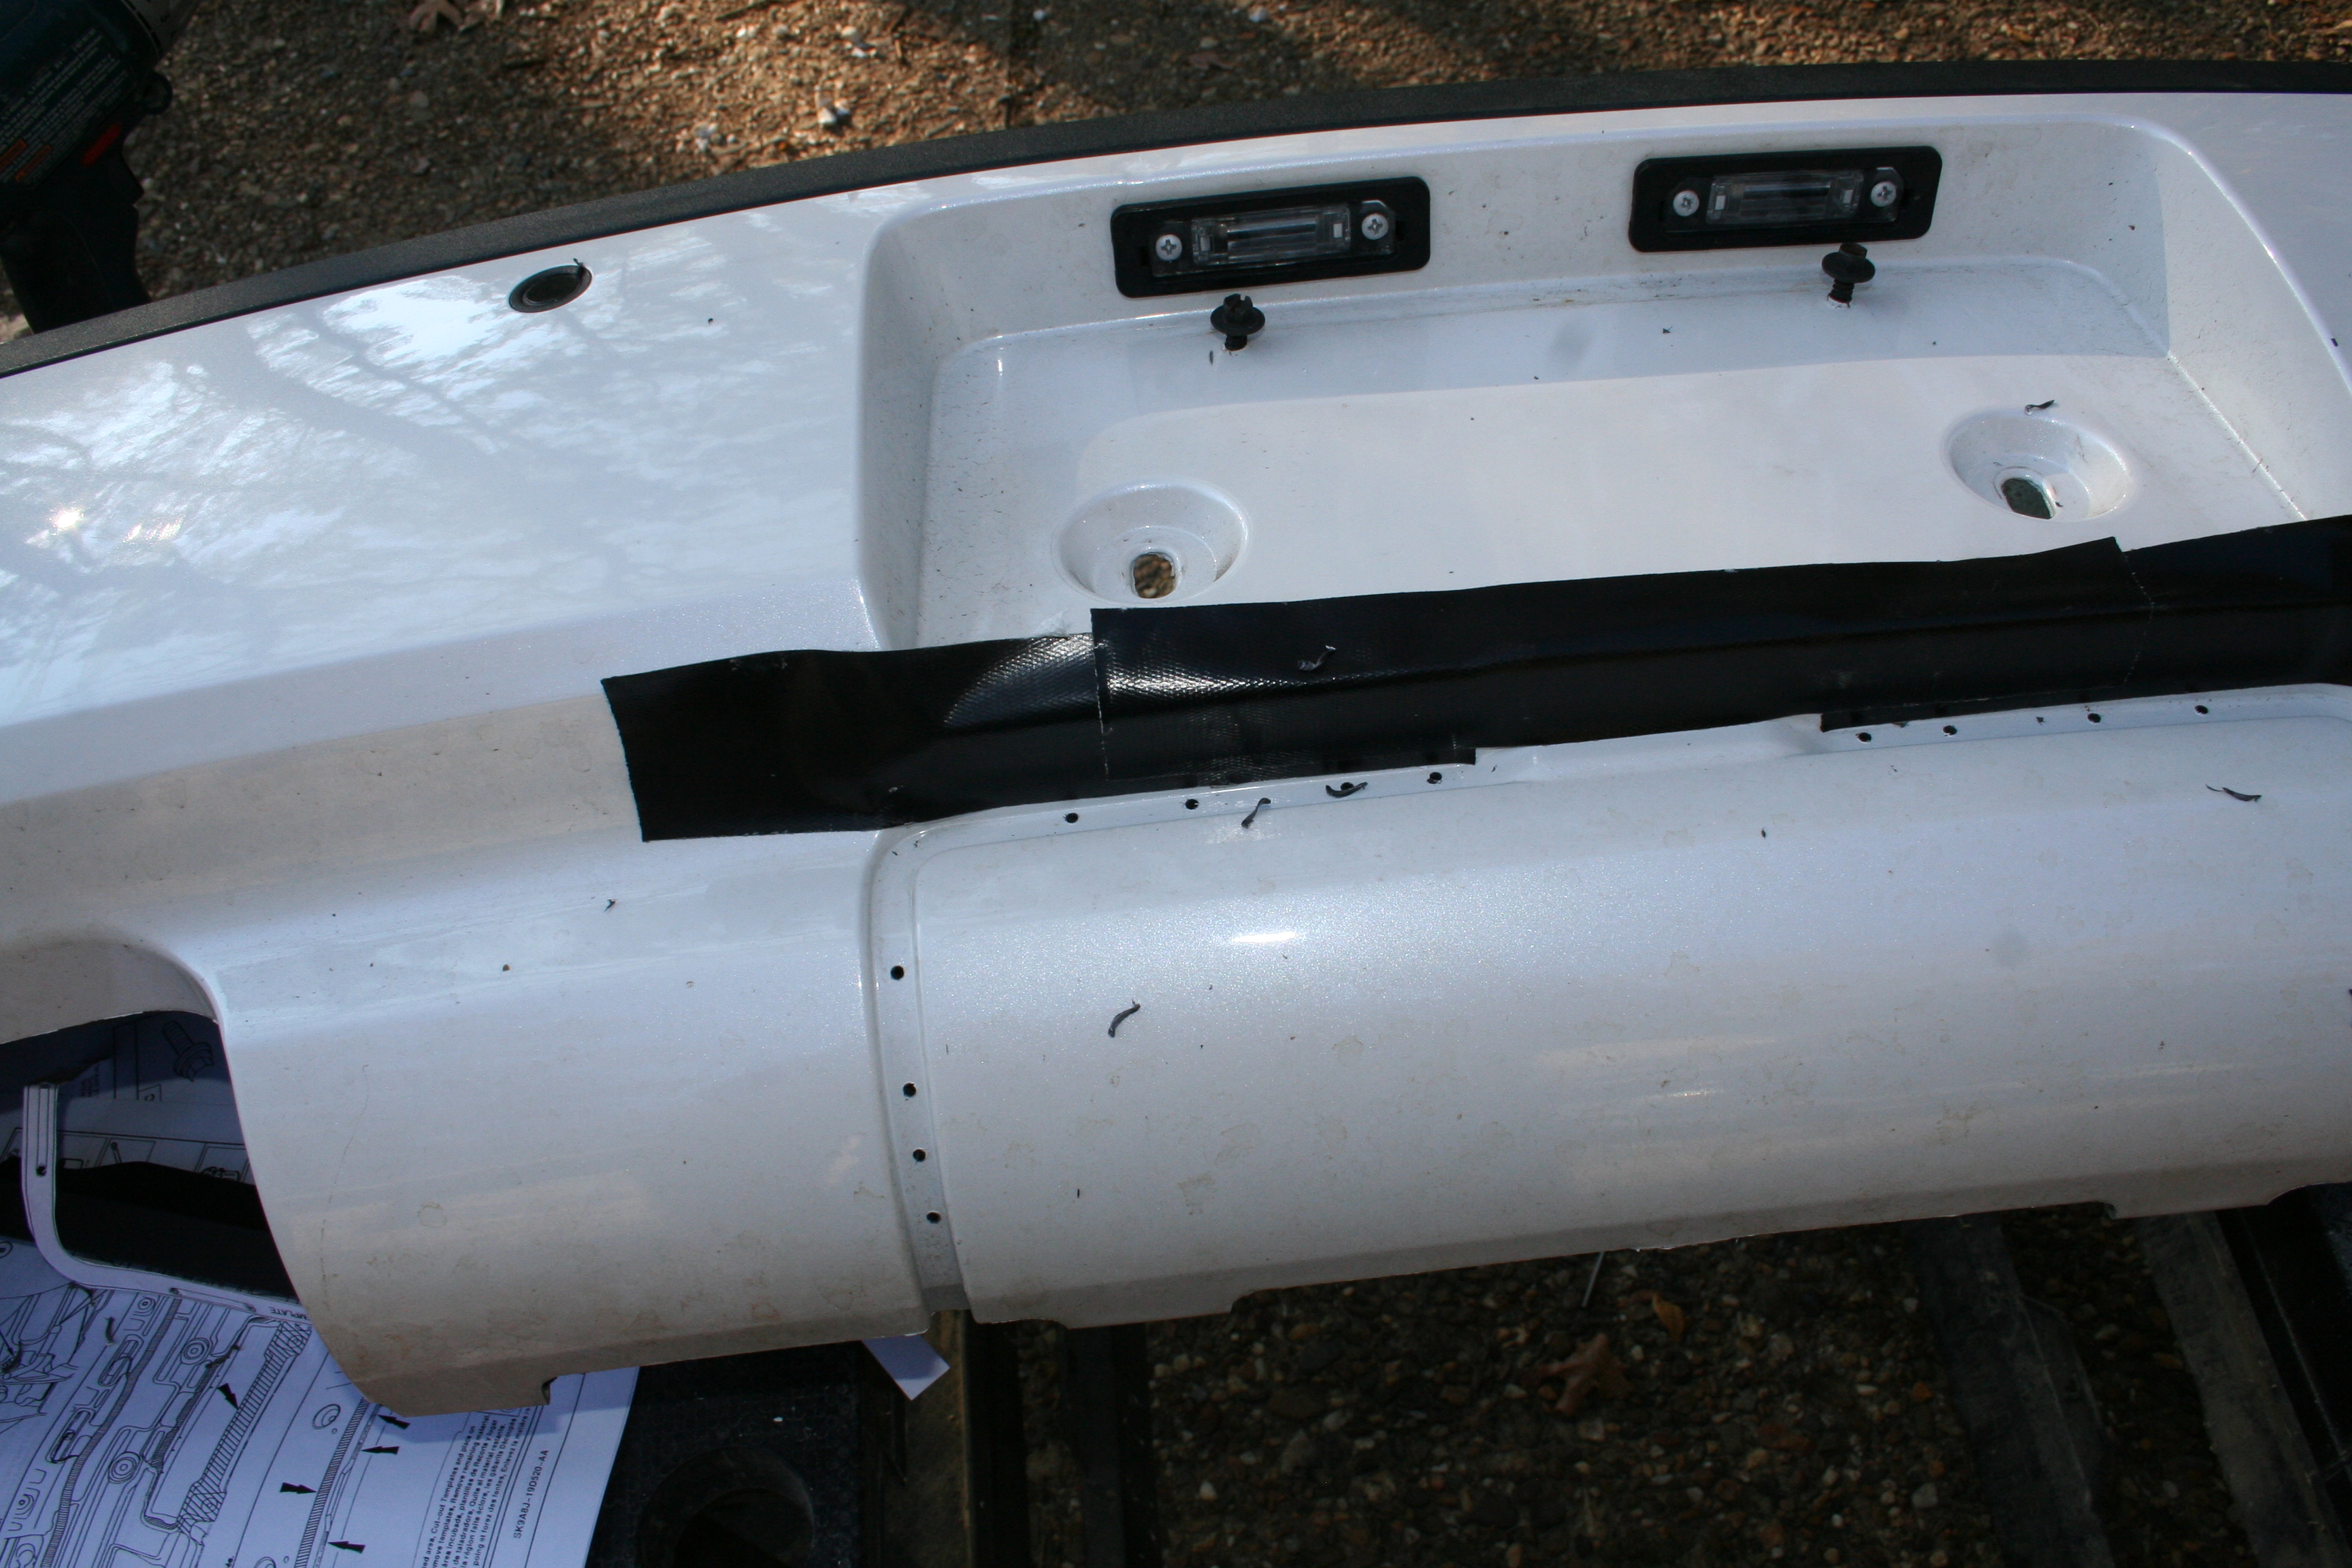
- The hitch cut comes with a paper template to cut out. It marks the locations of the slots the black plastic trim cover fits into.Cut the paper template out and drill pilot holes at the ends of the slots. The black tape is in place to protect the finish of the bumper cover.
- After drilling the holes, connect the dots to make the slots openings.
 Liberally apply more tape to protect the parts of the bumper cover that will remain before cutting the slots. I used the sonic crafter and a razor knife to fine tune the slots. Go slow, neatness counts here.
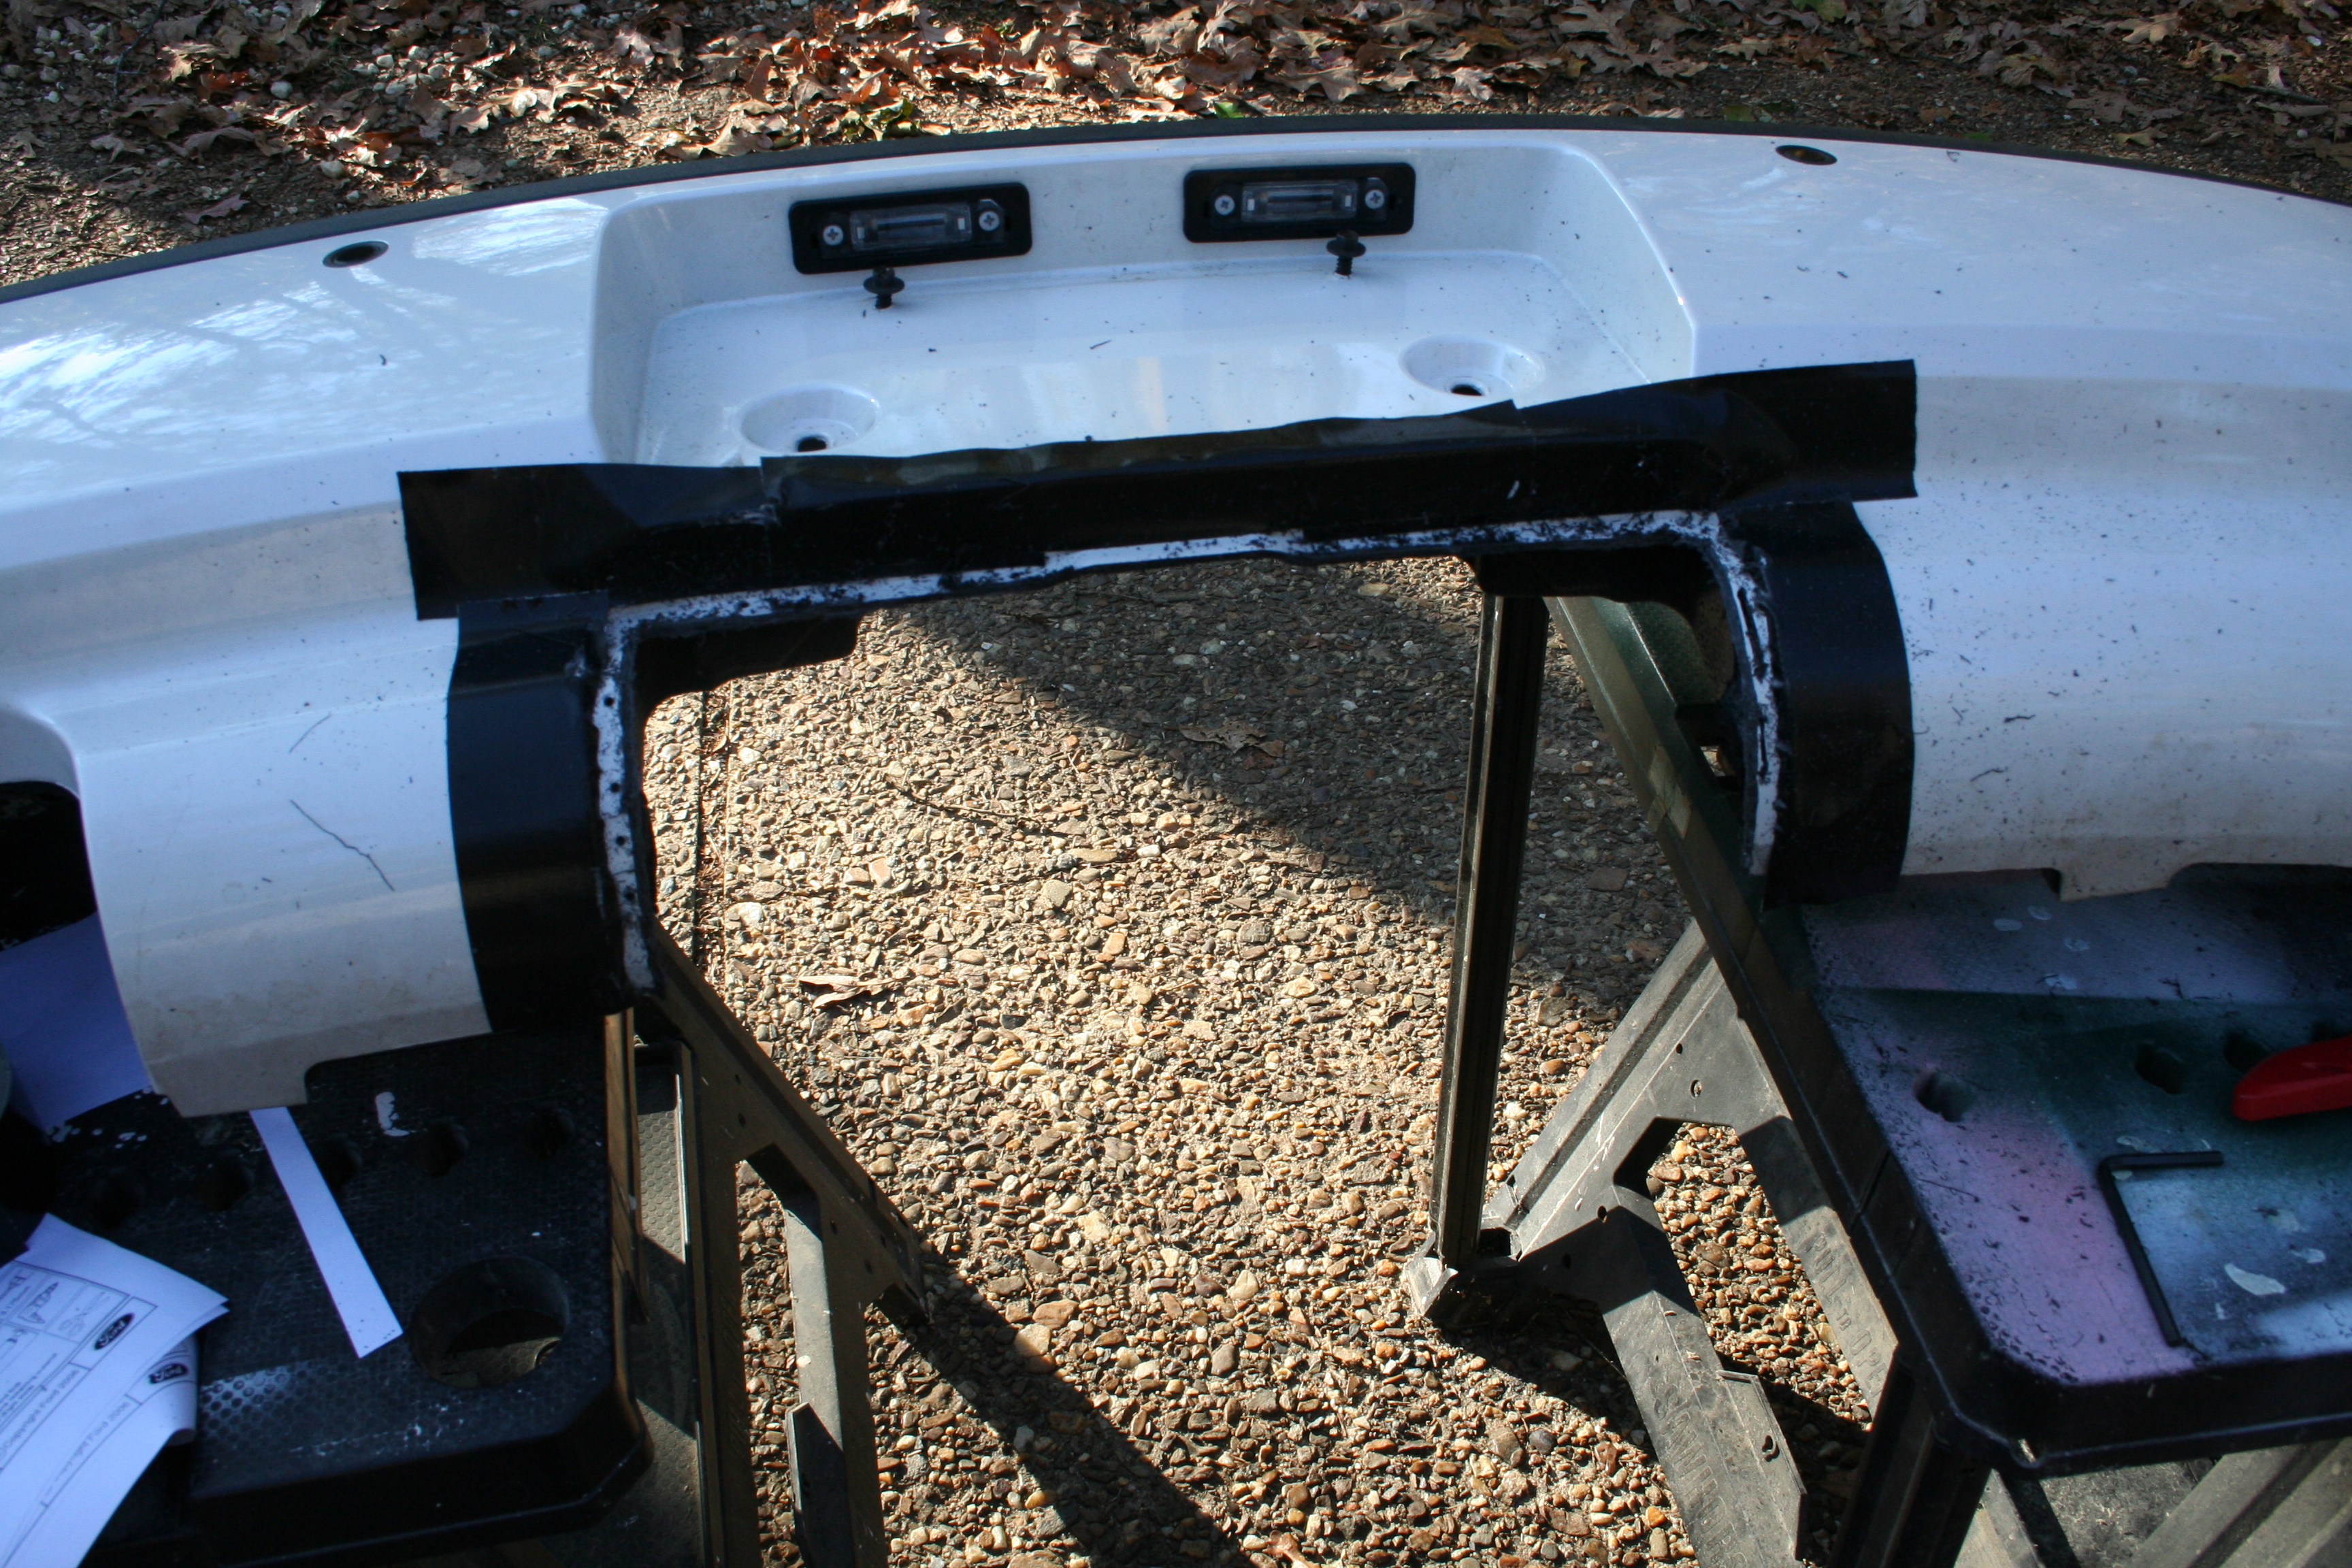
 - After cutting the slots, remove the hitch access panel. My bumper cover looked pretty horrendous after I finally got the panel cut free.

- Using the razor knife and sandpaper, clean up the rough edges. Remove the tape and dust everything off and it starts looking much less like irrecoverable disaster here.

- Test fit the trim insert, fine tune the slot openings as needed.
 The trim piece is just a pressure fit with long arms the fit into the slots.

Part 4: wrapping up
- Connect the wiring. The etrailer instructions are perfectly clear and the connection is simply a tee into the existing taillight wiring. The driver’s side
greenyellow wiring is shown. (Thanks to Tigran for pointing out the error)
- If routing the trailer wiring through the bumper isn’t your thing, this would be a good time to take secure the wiring before replacing the bumper cover. I used wire wrap and zip ties- it was quick and cheap. Routing through the bumper left me plenty of clearance and keeps everything out of the way.
- Reinstall the bumper cover, reversing the removal process.
- Reinstall the tailights.
Finished product: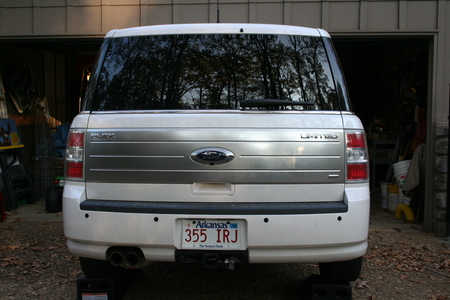

Light was fading, and I didn’t get the best shot. The takeaways from the pic is the integrated look. But overall, a very clean and factory look.
Left to do:
- Once I pick up my trailer, I’m going to figure out a better more permanent mount for the 4-pin connector. The factory hitch has a spots for two connectors. I would like to get my 4-pin connector mounted to the hitch itself, currently it hangs from one of the chain hook slots attached through the cap.
update: I used an inexpensive mount from Tow Ready. My installation is a bit flimsy, but the overall look is much improved. See comments below for part # information.

Scrivets part # W713445-S300
So this is the Class III factory bumper? I purchased a Ford Flex SEL without the bumper.
For the Ford Flex, there are two bumper options, those with a tow hitch receiver installed and those with a regular bumper installed. The bumper is the black metal piece. The bumper cover is the body colored plastic that I had to cut. As far as Class III vs. Class I towing capacity, that is determined by the drive train. The Flex is rated a Class III if it has an oil cooler installed. In either case (Class III rated or the lighter rating), the bumper is the same. The project I have outlined is swapping out the now-towing bumper with the factory tow hitch. The car will be rated as Class III towing capacity after I add the oil cooler.
Thanks for the great write-up for installing a hitch on the Flex. I recently installed the factory hitch on my 2011 Flex and am also concerned about the mount for the 4-pin connection. Did you find a better option to secure the wires?
I picked up a quick and easy solution, but I’m still looking for an upgrade. I picked up a 4-Flat Universal Mounting Bracket for a couple bucks.
I think I picked mine up at a Tractor Supply, but here is a good reference:
http://www.etrailer.com/Accessories-and-Parts/Tow-Ready/118149.html
This does an adequate job and looks pretty good. I’ll try to update with some pics this weekend. The downside is that it feels a little flimsy. I’d like to find some type of adapter/mount for either the 4-flat or round mounts that are already on the hitch.
Great step by step. Really helped with my Flex hitch install. Thanks!
Where did you get the black plastic cover around the hitch? The one pictured last.
Scott, I’m not sure which one you mean. The square hitch cover with “Reese” on came from Walmart or maybe Tractor Supply. If that is the thing you mean, it is pretty cheap and easy to find:
Google shopping search
Not the Reese cover on the hitch receiver. The black plastic trim piece going around the hitch receiver, attached to the bumper.
The trim came included with the factory hitch. The hitch kit comes with the hitch, the plastic insert, a template for cutting the bumper and all the bolts needed to make the install. The only thing the hitch kit does not have is the wiring.
The factory trailer tow also includes sway control. That’s a function of the vehicle’s ABS brakes. Has anybody added sway control? Is it just a matter of the service department reprogramming the vehicle computer, or are there additional sensors that need to be installed and hooked up?
Just finished installing a factory hitch on our 2011 flex. Thanks for your write up and photos.
I found that a 7/32 socket works well if you do not have a 5.5 metric.
A dremel with 1/8″ spiral bit on high speed worked well for the slots and cutting out the panel.
I purchased a wiring harness from E-Trailer and pulled it through the hitch tube as you suggested, very easy and allows a neat and clean installation.
Good call on the dremel, Vince. If I were doing that part over, I think the dremel might have been a bit easier to control than the relatively wide blade in the sonicrafter.
FYI: the former hitch kit number 9A8Z-19D520-C apparently ends in “D” now. In addition, the hitch that comes with it is no longer the same. It is missing the entire mid-span mounting point on the top of the hitch with two bolts (look at step 2, picture 3). I find it hard to believe it will be as safe and secure as the other style. Still says Class III with 4500 pound limit. Buyer beware…..
EDIT: make that Part 2, step 3, not picture 3 for a good shot of the top mounting point.
Interesting…..
I would have thought that advising people of the potential for a “downgraded” or “weaker” hitch, or the possibility that there are some defective hitches being shipped would have been some good info for people to know doing this project.
Hold your water- this blog moves in slow-mo. Comments are allowed, but moderated to prevent spam from showing up. This means that comments, even those that could advise about the potential of downgraded or weaker hitches, typically sit in a moderation queue until the random time that the Unknown Dog gets around to approving.
My apologies. This issue, combined with all the other issues on our early-build Flex, really has me hot-under-the-collar. I am off to the dealer to try and figure out what the story is with this hitch that is lacking an entire mounting point.
I’d be interested in hearing what the dealer says about the change. It has been my impression that the differences between version of a part, i.e., the “C” to “D” are typically minor.
Still waiting on any official info from dealer, but it is appearing that the part has been changed to eliminate the middle mount point. I looked at a 2012 model with tow package and it did not appear to have that mount point. My concern is: what changed on that later model to allow it to go away, and can a 2009 or other older model “get away” with using a hitch without that mount point?? Seems to me that if 2009 models had that, it should be there.
I called the manufacturer because the 6 bolts were missing from the box. They overnighted them to me. Nice!
While on the phone with the Engineer, I asked if the A-C or D was the proper part for my 2002. He answered yes, that D was the latest modification.
When I asked about the changes was told there were structural and very minor fitment mod’s.
I believe the center mounting bolt attached to the spare tire well.
The “official” word I am getting from the dealer is that this part has indeed been “improved” and no longer needs, or has, the center mounting bracket/point. Call me jaded but I would say “cheapened” is probably more accurate than “improved.” So I will re-iterate my original statement of buyer beware. So now my 2009 flex does not have the hitch attached at all of the points that any other 2009 does…
Vince: For clarification, when you say the engineer stated there were structural mods, do you mean structural mods to the car or to the hitch design itself? If there were structural mods made to the car then I am very concerned about using this hitch on an ’09 as mine would not have those mods to accomodate the elimination of the center point.
Mmm: He (Robb the engineer) was speaking of modifications to the hitch assembly. Robb indicated
that A-C or D would all work on any Flex model year.
The factory hitch arrives with instructions that are good, not as clear and concise as bturnip provided and no photos.
I am 100% satisfied with my install.
Thanks for the info Vince.
Thanks for the detailed instructions, I might not have tried it myself if it wasn’t for them! I installed the D version of the hitch so it didn’t have the two bolts above the receiver. The hitch is very substantial (the stock bumper is a joke) and I don’t think these two bolts would make any difference to the tongue or towing capacity. Everything went great, fed the wires through the hitch before bolting it in and used a dremel tool with cutoff disc to cut out the bumper cover and the slots for the trim cover. The sticker from Ford on the hitch above the 4 pin spot says it’s still a class III, 4500 lbs towing, 450lb tongue weight. The only problem I had with the install was the template that Ford enclosed was a photocopied version and was not to scale! Their legend of 1″ was in fact only 7/8″. I offset the holes to make the slots a 1/4 inch longer than the template and it worked out.
Outstanding write up and very useful added comments. Just finished installing mine, looks and works great. Thanks!
Hi bturnip,
I have a 2012 SEL AWD (purchased without the tow package) and I just want to clarify: If I get a after market hitch from Ford, they will only give me a class I hitch? Or do I tell them I want to get the class III hitch AND an oil cooler? Is the oil cooler an absolute necessity? I don’t plan on installing the hitch myself…
How much would an oil cooler run with install? I love my Flex, but hate the dealerships and dread going.
Thanks, and great instructional!
The post here covers installing a Ford factory hitch to a Flex when it wasn’t originally equipped with one. When you purchase the hitch covered in this post, you will get a “class III” hitch. Even with a class III hitch, the Ford Flex won’t be rated to haul that much unless you also add the oil cooler. Think about it like this- you could add this hitch to a go-kart, but that doesn’t mean it could actually haul that much weight.
As far as being a necessity- my opinion is that if you are going to tow enough weight to max out the class III weight rating, the oil cooler is required. I can’t speak to the cost of adding the oil cooler. I’d try fordflex.net and ask in the forums there.
Good luck!
Thanks!
Just wanted to say thank you for the write up and photos. Your instructions were better than the ones that came with the hitch. I appreciate your time and effort. I saw class one hitch and thought it was the small one till i came on here and saw your photos. I could not be happier with it. I will not be towing anything major but for what I will be using it for, it will work perfect. Thanks again, Richard
Thanks for the kind words. A big reason for me posting the write up was to show folks that it could be done fairly easily at home. Glad it helped!
I am working on my install and your photos are a great complement to the instructions provided by Ford. One thing you do not cover is how you routed the wiring from the tail light into the bumper. I opted for the factory kit but those instructions provide no guidance at all on how to actually route the 4 pin connector. Clearly it has to exit the car somewhere to end up under the plastic bumper cover, but I don’t see any holes large enough to pass it through.
Scroll down to Part 4. If you click on the images, they will open full size, and you will be able to see the rough locations for where the wiring ran up to the tail lights. It has been a while since I did this install, but I don’t recall any problems getting the bumper cover back on.
Hey Man ,this is the one of best install tutorial I’ve seen . I just want to make sure this receiver is a 2″ and not the 1.25″ . The parts counter couldn’t even tell me 100% which size it is .
Thanks
Thanks for the kind words. This is a 2″ inch.
Thanks for the fast answer, I’m going to order mine. The oil cooler looks like a pretty easy install also. I think the cooler would be a good addition even if you don’t plan on installing a tow pkg.
Well, after seeing the the step by step instructions and outstanding photos, I am convinced on installing my own hitch on my 09. I thought the detailed info that Bturnip posted was better then those in my military maintenace manuals, and to Tim your correct a transcooler is always a way to increase life and performce out of your transmission, towing or not. Thanks Guys.
P Steiner, USA Retired
Thanks for the kind words! I’m almost completely satisfied with my hitch install. I am going to turn my attention back to the 4 pin connector. The inexpensive mount that I used didn’t hold up very well. What I really need to find or fabricate is a way to mount the 4 pin connector in one of the existing locations on the hitch. I’ll update this post if I find something. Good luck on your install, Peter!
WE found your FORD FLEX 60/40 seat blog….we are accepting our third baby in late January and want to stay in our FLEX….good payment and great car.
Can you share how you went about finding the seat through a salvage yard?
should I just go to my local salvage yards and see if they can round it up?
excited about what you did….hopefully we can do that same!
Thanks for sharing your story…it was an awesome relief to it was even a possibility.
thank you for your time in advance,
Melissa & Shawn Hall
When it comes to trying to find a seat, I would definitely try a local salvage yard and see if they can find one. I would also recommend checking out the want ads at fordflex.net. I also searched car-part.com for a salvage yard that had the right seats. In my case, the want ad came through first. I found a guy that was only a few hours away and made the swap. Good luck!
Hi there. So I just would like to know that if I put this hitch on can I pull my 2900 hundred pound boat and trailer safely without the ripping the hitch off the bumper because the hitch is rated for 4000pounds?
Hi Steve-
The hitch and the bumper are a single welded piece, the hitch isn’t coming off the bumper for 2900 lbs. worth of boat and trailer. This hitch is the factory OEM and is rated as Class III, which is well within the class III rating; properly installed, the hitch isn’t pulling loose from the vehicle under that kind of load.
All that said, putting on the factory hitch does not make the Flex tow-ready for Class III loads. The factory tow package adds an oil cooler (non EcoBoost engines) and sway control. This PDF file from Ford has more information: http://www.ford.com/resources/ford/general/pdf/towingguides/12FLRV&TT_FlexDec7.pdf
I always order a towing package to get the oil cooler & sometimes comes with bigger alternator & radiator. Believe the oil cooler can only help engine longevity especially with the turbo engine.
I must say, this is as fine a tutorial as I have seen on a topic that I have so much interest in. I have a 2013 Flex Limited without tow capability, and now need to make tow accommodations since I am purchasing a trailer to haul my kayaks around–not a lot of weight, but I need an alternative to throwing the boats on top–at least that’s what my back says. I don’t like the look of the low slung aftermarket tow packages, so your tutorial is exactly the information I needed to determine that this is a project I can handle (hopefully) and get the product and the look that I want. Would you have any idea about relevant part changes for the 2013 Flex? And if not, what would you suggest I do to ensure I order the proper parts? Thanks again for the fine article; photos; and commentary. Your time and efforts are appreciated.
I have no direct knowledge on the part changes for 2013. I went to accessories.ford.com, filtered on 2013 Flex and found the part online here: http://accessories.ford.com/kit-trailer-hitch-bar-10184.html. Part # for that is 9A8Z-19D520-D. That is the same as mine except for a “D” revision. Scroll up in the comments to see a discussion on the D vs C series.
As far as towing rating, if you have the Ecoboost models, installing this hitch WILL give you class III rating. As long as you can install all the wiring for the 4 and 7 pin connections and add the brake controller you can tow the same as with the factory, but only on EB equipped as they do not come with an oil cooler at all. The only thing you cant do with after market is the sway control, whether it can be enabled afterwards is unknown. On the non EB ones though, you are limited in what you can pull without the oil cooler. Nothing else is upgraded in the tow package other than the hitch, wiring, sway control and oil cooler on those, and all but the oil cooler on EB. The hard part is replicating the power distribution box under the hood on non tow Flex. Haven’t quite figured the best way to get power back there for the brakes and battery charge circuit.
Thank you very much for the informative beyond belief step by step instructions regarding this project. I have a 2013 Flex Limited. Do you happen to know if the tow package part that you identify is the correct one for the 2013? Or has the part (or part number) changed? Or should I do a little independent investigating on this. Thanks again. Your tutorial has given me hope that I can do this project.
Sorry for the double post. I didn’t see your prior response! Thanks, Scott
Well, exactly the infos I was looking for! There is only one thing I have not seen anyone comment about, and it’s the converter box.
I’ve already ordered the hitch from my local dealer, but when it came to the wiring harness they ask 120$ for it (yeah, being in Canada can get expensive sometimes). When I looked up the schematics, I noticed there is a converter/power box in it, but the one you use doesn’t have it (well actually, there is another model on etrailer that has it for around 20$ more).
Anybody has some sort of comment on this? Is running without the converter/power box can result in blown tailights or other issues? Why would I need the box?
I don’t know anything about the converter box, so I can’t comment there. Speaking from my experience, I haven’t had any trouble with the lights running without the converter box, and the lights are the only thing I am hooking up on my trailer- no brakes, etc.
Good enough for me then. Without converter box it shall be. Thanks for the help!
Thanks for the detailed instructions. Awesome guide. Quick question: If I just need to install a bike rack and would never use the hitch for anything else, do I still need the wiring? I assume I would not require it but thought I would check anyway.
Hi Amol-
Sounds like you wouldn’t miss much from skipping the wiring. If you add anything on later, a hitch mounted cargo platform like I did here, for example, you can always install the wiring at that time.
Another thing to keep in mind- if you already have a bike rack and it is made to fit a 1 1/4″ hitch, you would need a sleeve to make it fit correctly with the factory hitch.
Piling on here; Great write-up on the Flex hitch install – Thanks!
I just completed the same install on my ’09 this past Saturday in preparation to load up the flex with a hitch platform so we can cart my kid’s stuff to college in August and thought I’d comment on a few things;
1) I ended up getting a -D model hitch from Levittown Ford (http://www.levittownfordsupercenter.com/index.php) which had the best price at the time I searched. Fast and cheap shipping (I’m only about two hours down the NJ Turnpike from them). The -D model does not have the middle mount with nuts/studs under the tailgate latch… As others mentioned, I don’t see this as a deficiency since only the tongue weight need be handled by the studs.
2) I was tempted to pull out the ramps but found I could do it all without resorting to them – more of a preference call.
3) I was going to support the muffler but found the jack stand to be more of an obstacle than a help – again, preference, but I found the weight of the muffler wasn’t too much for the inboard rubber mount.
4) Upper hitch nuts had blue thread locker on them so I reinstalled them with more blue thread lock. Left side lower bolts went in very nicely, with the upper inside bolt being a bit more stiff; more thread locker on those too but I doubt it was needed
5) My biggest challenge came with the right side bolts; The inward most, lower one went in hard but it eventually gave way. The outboard lower one did not go in very well at all; I’m not convinced there were threads in the unibody to begin with since I had to use a air wrench to drive that one in. The upper inside one was equally difficult and since I could not use the air wrench on that one (given the close quarters and not having a impact universal), it took about 15 minutes of very labored hand wrenching/ratcheting to drive that one. I did lube each one prior to installation but I don’t feel it helped very much. No thread lock used here since the air wrench vibrated it all off!
6) I researched the whole taillight harness issue and while I don’t plan on pulling anything big (maybe my son’s BSA troop trailer) – we’ll use it for a bike carrier or a platform primarily and maybe the occasional stump grinder or log splitter rental (but my F-150 can do that!) – I ended up punting; I didn’t want to install the “T-Connector” variant as noted above and a number of other folks sell since the Flex’s harness is only built to deliver current to the LED taillights. Looking at the harness, and while I didn’t measure the gauge, I do think an incandescent equipped trailer could easily strain the vehicle harness over time (hopefully the fuse is sized to protect the wire). I’ll look into it again later but I’ll probably go with the converter style trailer harness.
7) Trim went in fine – but one word of caution; the slots really need to be 1/8″ and no more. I got a bit sloppy with a few and while the trim is on well, the one tab is a little loose. I initially tried a Dremel disk cutter in a horizontal fashion but found there is not enough room for the small disk to clear the trough without having to angle it…. In the end I scrapped the disk and went with a 1/8″ rotary bit which allowed me to plunge cut vertically and carve out the excess very well.
8) I may be interested in doing the oil cooler but I can’t justify it now.
Overall, I’d say it took me about 2.5 hours, give or take 20 mins. All in all the hitch looks sweet – so much better than the aftermarket versions.
Hope this helps the next person!
Bill.
Just installed the hitch… ending with a “D” on my 2013. Your guide was a great help but I noticed in my box with the new hitch were 6 new bolts. Since there are 10 spots to bolt on the hitch I am not sure where just the 6 go. I counted 4 on the bumper… 2 on each side (2 are actually studs with nuts), 4 verticles on the exhaust hangers (2 on each side) and 2 verticle on the exhaust (1 on each side).
So do the 6 new bolts just go on the exhaust connections?
I don’t have a good explanation for the bolts. If you look through the comments, there is at least one mention of not having enough bolts, but I’m not sure about extra bolts…
Thank you very much for great step by step explanation and pictures! I just finished my project, everything went nice and smoothly.
Just one little remark in part 4 picture 1 the wires are supposed to be yellow for driver side. In the picture it is shown correctly, however the text says that the wires are green.
Thank you again for a great instructions.
Regards,
Tigran.
Thanks for the reply, I’ll make a note in the post.
I had to remove the rear bumper to fix my reverse sensors. Your instructions were great!
Fantastic- thanks for the note- good to see this post is still helping folks out.
I was wondering how much the oil cooler was installed or did you diy it?
There is no oil cooler on this one. I put it on the to-do list, but I haven’t done it.
Thanks for the kinds words- nice to see this post still has some legs.
Had to drop a line and say thank you. Your write up was great. 2015 and still helpin others! Thank again
Thanks very much for this post. I was having trouble removing my bumper cover in order to replace a broken parking-aid sensor. I couldn’t get the sides of the bumper cover off – it felt like there was another fastener. Your comment, ” less force than rip starting a balky lawnmower”, plus the picture, gave me the confidence to pull harder, and it finally came off. So now my backup alarm works again. Thanks very much.
Is the wiring kit sold with a 5 pole connector?
The wiring kit I used (and linked to) has a 4-flat connector. It can be used with a 5 pole connector, but would need an adapter.
Just did the conversion this past weekend on my 2011. Saved shipping costs by picking up at the dealer as indicated….thanks! It all went together in under 3 hours. Used a Drimmel Multimax for the transition piece holes and overall cutout. Thanks for the great post.
I wanted the older version of the bumper/hitch with the extra supports in the middle, and since the dealer can only get the newer “D” version, I bought the original production part from a junk yard for $75. The only problem is that I don’t know how tight to torque the bumper bolts? Can anyone share this info? Thanks
The bolt head on passenger side, below tail light, snapped off. I over torqued the nut. Does anyone happen to know the part number for it? I have to find a way to remove it now.
remove broken bolt and replaced it with regular bolt so I didn’t need to use the nut anymore. Do you know any through guide for installing factory wiring kit on 2010 Limited with LED rear lights?
Wiring kit part DT4Z-15A416-A
Thank you for this awesome guide. Do you always have to turn off rear parking sensor assist when towing something?
Pingback: Another year with the Unknown Dog | Unknown Dog
I find the comments about install on a flex with the Eco-Bost engine confusing. The oil cooler is required to meet class III. It is not required. Or it can’t be added.
Excellent directions. A couple of things I learned while doing this. The Ford 7-pin OEM wiring connector XL3Z-14489-BA is actually made by Pollak, with a Ford logo replacing the Pollak logo. Google the prices and you will find that the best online price for the Ford part is about $46, but the Pollak 11-893 part is about $10. Parts are identical. Also, when installing that connector on the hitch, put the hinge on the right hand side, not the top. It attaches with two M5 X 12mm screws that are not included with the part or the hitch. This plugs directly into the DA8Z-15K868-H wiring harness. If you are installing the Ford hitch, that is the only wiring harness to use. It makes use of the Ford trailer prewiring–most other aftermarket harnesses do not.
Thanks for the additional info!
Can’t say thanks enough for your blog. You made a two day project into a four hour project. Coupla details were different, but I have a 2014. Heads up for others wanting to do this as of Aug 2014 the backorder time for ths needed wiring harness has been between 4-5 mo. If you want to use a boat in the spring… order your harness in November or December latest.
Great – I love that this post is still helping folks out!
I find the comments about install on a flex with the Eco-Bost engine confusing. The oil cooler is required to meet class III. It is not required. Or it can’t be added.
—————-
Same here. I have a 2014 ecoboost. Does it already have an oil cooler? Or is it just not needed? If not, what if I put one on? Can you install on an ecoboost? Will it only further help towing anyway? Just a waste of money but peace of mind? Thanks
This is my understanding- if you have the Ecoboost engine, you already have an oil cooler. I don’t know what it adds to reaching class III rating in the Flex. I would think that it helps control overheating if the Flex was under a heavy load, towing uphill, etc.
Where can I get the paper cut out and the trim piece? Can these be ordered through Ford or aftermarket?
The kit that I bought included both, I don’t know if they are available separately.
Thank you for the post. After 6 years, this post is still just as effective as when new. Thanks to your detailed instructions, this task was knocked out in around 2.5 hours. I used a nibbler to make the cuts on the bumper cover and a dremel as mentioned above and that really made everything simple and clean. The instructions that came with were also very good but pictures with a detailed write up beat sketches every time. The only question I had was: Why replace the bolts? I didn’t see them as being any different than what was already on the bumper.
It has been quite a while since I switched this out- if my fading memory serves me correctly, I think the instructions that came with the hitch explicitly said to use the included replacement bolts. I don’t recall if there was any explanation given.
Have a 2015 LTD. Want to put a trailer hitch on but cannot get anyone to tell me exactly how much I can tow. Want to get a camper. Where can I find what I can pull and what equip I need to add.
From a quick google search: “ How much can a 2010 Ford Flex tow:
The top result for me was this: Towing Guide
Long story short:
The big caveat there is that it seems like the Towing guide assumes that the Class III towing package is installed, which includes things like the sway control and oil cooler, the latter of which was not standard on non-Ecoboost engines in 2010.
Hello,
Does anyone have the OEM hitch install instructions and the template for cutting the bumper cover that they could share with me?
I am installing an OEM hitch on my 2016 Flex. When you buy the hitch they no longer come with instructions, bolts, trim piece, or template. I ordered all the correct fasteners and trim piece seperatly. Thank you for your help.
Good luck- maybe you can make your own template from tracing the trim piece on paper? I’m just guessing, it has been a long time since I installed my hitch…
Great post I am only wondering if someone has the part number for the oil cooler I am installing it on a 2017 flex
Ok I guess I am confused. The PDF file I have from Ford on installing the Factory 4-pin connector involves running wires up to the engine bay, but after rereading it these wires are just to tap power directly from the battery, so this appears similar to your aftermarket 4-pin kit you installed, except main power is from the battery. Do you know if a wiring harness is available from the rear 7-pin connector to the engine bay? I assume then I need to install the secondary fuse box for it? Sounds complex but it’s worth investigating. What else did you find out when you were looking into this?? Do you have copies of the wiring diagram for the tow wiring?? Thanks!!
Just installed a used hitch on a 2013 Flex. All went well thank you very much! Only challenge was cutting the slots without a template. Jim in South Central PA.
Is there an updated link to the part? Trying to do this on my 2019 Flex and the part link is no longer valid
There has been another revision to the hitch, the part number is now 9A8Z-19D520-D. I’ve updated the post.
I actually traded my 2010 Flex for a 2019 a little while ago. Installing the hitch was a breeze- the process was basicially identical. If I remember correctly, the one significant change was that the flange for bolts in the middle was deleted in the latest revision.
great write up. I am about to start my install. I found a $100 bumper reinforcement at Car-Part.com. They are a junk yard site that connects to lots of yards. They ship, or find one close to home and go pick it up. I cleaned and rust proofed mine, so it will last. I do need the trim piece, I suppose Ford sells those separately. I will update my 2015 Flex project as I get it done. Can’t wait.
Great post
I have a Ford Flex Limited Ecoboost 2018, is there also a trailer hitch for the Ecoboost ?
if yes, which ?
Thanks
All versions within a model year use the same hitch part number.
This is a great write up! Thanks for all the details!
I recently had a major accident with my 2011 that caused it to be written off. Before I released it I removed the factory tow hitch and am now going to install on a 2013 flex I picked up. I had to buy a new trim piece to cover up the cut out. Was hoping it would come with the template, but it did not. Any chance you or anyone has an electronic copy of the template?
Cheers
Ron
I looked for one- I felt like I had a pdf version somewhere, but I didn’t find it. I remember the hitch coming with a paper template, but I cut it out and used it. Now I wish I had made a few photcopies first!
Thanks for checking. Guess I will have to wing it!
Really appreciate your detailed instructions, huge timesaver. I installed the “D” hitch on my 2017 Flex and so glad I went with OEM vs aftermarket. The back half of the vehicle will rip off before this hitch does.
Not sure if Ford used loctite or something but most bolts were a bear to remove and install, I was convinced they were cross-threaded. Torqueing them to spec is kind of a joke given the amount of force needed but really make sure they are in all the way.
Saw folks asking about the template, I scanned and posted below. I recommend being conservative with your cuts, you can always shave off a little more but you can’t add back.
DISCLAIMER: This is a scan and may not be to scale, measure the included scale on the sheet to confirm. You can resize the image in a graphics tool if need be.
https://i.imgur.com/CUR6Nro.jpg
Thanks for linking to the scan, good resource.
Just used your write-up to do a factory install for my 2019. Aside from a few bolts being an incredible PITA to remove it was pretty much as you described.
One piece of advice id give to anyone who follows is to buy some of those “Scrivits” as part of the install. They’re cheap plastic and universally strip when you apply any torque to them. You’re much happier tearing them out and replacing with new.
Thanks again for the tutorial, now on to the roof rack…