
An attic story, some new progress.

1- Terrible picture, but this is the only pic I have of the starting point. If anything, this makes it look better than it really was.

2- Lots has happened between the first pic and this one. This is the part that was a real pain- leveling out the ceiling joists so I could lay the subfloor. Also, I slipped and shoved my leg through the ceiling during this part. The section in the back was newer, so i was able to lay subfloor in that section without fiddling with the celing joists

3- Finished the subfloor, and, in a fit of joy, quickly framed up some knee walls. The 3/4 height structure is in place to cover the existing plumbing for the water heater.

4- This pic shows some of the progress on the back half of the attic project. The front part, in the foreground of the last couple pics, will be the computer room. The back half, reached through the office area, will be a guest bedroom. In this pic, the short side knee wall has been framed, the roof has been insulated, and the ceiling has been framed out at 8′. I would have considered a peak ceiling, but I felt I had to keep the existing bracing more or less in place.
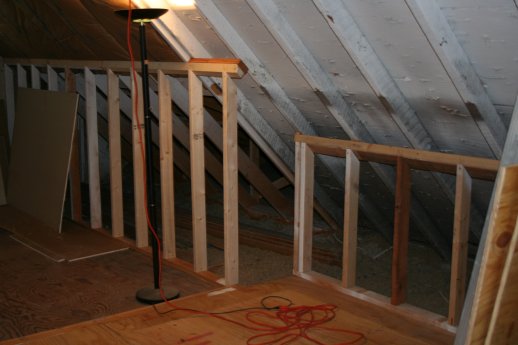
5- Framing out the knees walls of the office area…

6- By now the guest room partitions have been framed, the bay for the bed has been built, sheetrock hung. This shot is from the entrance to the guest bedroom, looking in. The first hole that contains the water heater will be covered with a swing-away bookcase. Nothing exotic for my secret door, but functional.

7- The bed bay has swivel-eye recessed can lights that will be controlled from a switch located in the built in shelving area visible in the previous picture.

8- Looking out to office area. The switch by the door will control a ceilng fan, and the receptacle is one of 3.5 located in the guest bedroom. The .5 comes from a combination outlet/switch device located in the bed bay. Square footage comes out to be right at 100 ft², not counting the bed bay, which is sized to fit a full size mattress and box spring and still reasonably sleep 2 folks.

9- Used texture paint to hide the fact that I haven’t developed good sheetrock finishing skills. Didn’t go with the popcorn finish, so I compromised and choose “sand” texture instead. Covers up a load of bad sheetrocking, quite frankly. This picture shows cutting in with the final color, after priming, texture painting, and priming again.

10- Wild Honey (aka light brown?) for the walls.

11- A little beadboard wainscoat paneling, a little chair rail and assorted trim…

12- Insert cleverly built swing away book shelf here…

13- view from the corner- you can see the recessed light for the sleeping area in this shot.

14- Door trim isn’t finished yet, but if you squint, you can see how the beadboard wraps into the door opening…
Secret doors are awesome!
I would immediately set up some drum sets and several amps then begin recording my first “studio” album.
Hello Evan—just admiring your attic work. I’m think about doing essentially the same thing as you did, and would love to hear any big picture things to consider before jumping in. My space is about 14 x 31 or so, which I plan on cutting into a loft type bedroom and an office, in addition to possibly a bathroom (I can only imagine the trouble on that front. Anyhow, I would love to hear words or caution or advice—thanks in advance—
Patrick